List의 부가 기능 구현하기
Pull Refresh
Apple Developer Documentation
developer.apple.com
화면을 아래로 끌어당겨 새로고침 하는 iOS의 가장 보편적인 새로고침 방식이다.
struct PullToRefresh: View {
    @State private var items = AppleProduct.sampleList[0 ..< 2]
    @State private var index = 2

    var body: some View {
        List(items) { item in
            Text(item.name)
        }
        .animation(.easeInOut, value: items)
        .refreshable {
            await refresh()
        }
    }

    private func refresh() async {
        do {
            try await Task.sleep(nanoseconds: 1_000_000_000 * 2)
        } catch {

        }

        guard index < AppleProduct.sampleList.count - 1 else { return }
        items.append(AppleProduct.sampleList[index])
        index += 1
    }
}
핵심은 refreshable modifier다.
해당 modifier를 List에 추가하고, closure에 동작을 전달하면 된다.
예시 코드에서는 refresh 메서드를 호출한다.
private func refresh() async {
    do {
        try await Task.sleep(nanoseconds: 1_000_000_000 * 2)
    } catch {

    }

    guard index < AppleProduct.sampleList.count - 1 else { return }
    items.append(AppleProduct.sampleList[index])
    index += 1
}
일정 시간의 지연 이후 index의 크기가 sampleList의 원소의 수 보다 작은 경우
해당 index의 데이터를 items 배열에 추가하고 index를 1 증가한다.
실제 구현에서는 네트워크를 통해 데이터를 다시 요청하는 등의 동작이 구현되면 된다.
Swipe Action
Apple Developer Documentation
developer.apple.com
struct SwipeActions: View {
    @State private var favorites = [AppleProduct]()
    @State private var allProducts = AppleProduct.sampleList

    var body: some View {
        List {
            Section("Favorites") {
                ForEach(favorites) { item in
                    Text(item.name)
                }
            }

            Section("All Products") {
                ForEach(allProducts) { item in
                    Text(item.name)
                        .swipeActions {

                        }
                }
            }
        }
    }
}
List의 안에서 SwipeAction을 추가한다.
보통은 Button으로 구성하며, edge 파라미터에 따라 왼쪽이나 오른쪽 액션의 지정이 가능하다.
struct SwipeActions: View {
    @State private var favorites = [AppleProduct]()
    @State private var allProducts = AppleProduct.sampleList

    var body: some View {
        List {
            Section("Favorites") {
                ForEach(favorites) { item in
                    Text(item.name)
                }
            }

            Section("All Products") {
                ForEach(allProducts) { item in
                    Text(item.name)
                        .swipeActions(edge: .leading) {
                            Button {

                            } label: {
                                Image(systemName: "hand.thumbsup")
                            }
                            .tint(.blue)

                        }
                        .swipeActions(edge: .trailing) {
                            Button(role: .destructive) {

                            } label: {
                                Image(systemName: "trash")
                            }

                        }
                }
            }
        }
    }
}
leading과 trailing의 edge를 가지는 두 개의 swipeAction을 구성했다.

.swipeActions(edge: .trailing, allowsFullSwipe: false) {
    Button(role: .destructive) {

    } label: {
        Image(systemName: "trash")
    }
}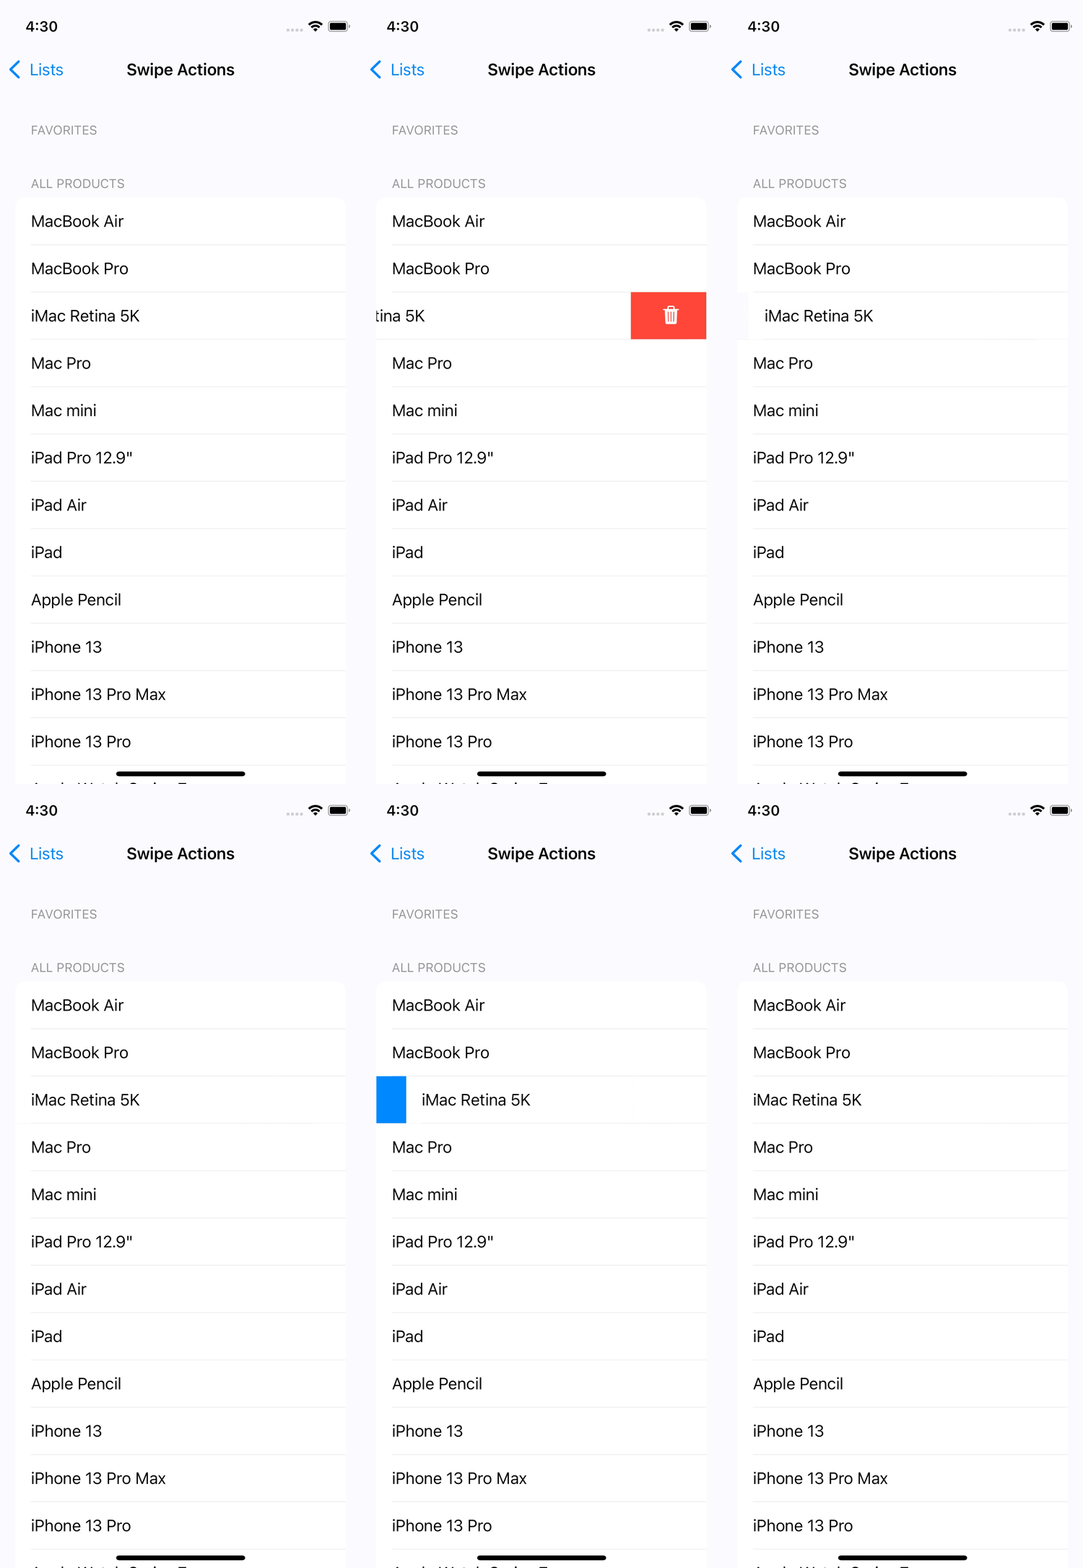
allowsFullSwipe로 FullSwipe 기능을 비활성화할 수 있다.
Cell을 절반 이상 Swipe 하게 되면 Full Swipe로 인식하게 되는데,
해당 방향에 여러 Action이 있는 경우 가장 첫 번째 Action이 실행된다.
struct SwipeActions: View {
    @State private var favorites = [AppleProduct]()
    @State private var allProducts = AppleProduct.sampleList

    var body: some View {
        List {
            Section("Favorites") {
                ForEach(favorites) { item in
                    Text(item.name)
                        .swipeActions {
                            Button(role: .destructive) {
                                withAnimation {
                                    if let index = favorites.firstIndex(of: item) {
                                        favorites.remove(at: index)
                                    }
                                }
                            } label: {
                                Image(systemName: "trash")
                            }

                        }
                }
            }

            Section("All Products") {
                ForEach(allProducts) { item in
                    Text(item.name)
                        .swipeActions(edge: .trailing) {
                            Button {
                                favorites.append(item)
                            } label: {
                                Image(systemName: "hand.thumbsup")
                            }
                            .tint(.blue)

                            Button() {

                            } label: {
                                Image(systemName: "flag")
                            }
                            .tint(.orange)
                        }
                }
            }
        }
    }
}
각각의 Section에 적당한 SwipeAction을 추가했다.
Section("All Products") {
    ForEach(allProducts) { item in
        Text(item.name)
            .swipeActions(edge: .trailing) {
                Button {
                    favorites.append(item)
                } label: {
                    Image(systemName: "hand.thumbsup")
                }
                .tint(.blue)

                Button() {

                } label: {
                    Image(systemName: "flag")
                }
                .tint(.orange)
            }
    }
}
특히 두 번째 Section에는 두 개의 Action이 존재한다.
이를 통해 FullSwipe가 어떻게 작동하는지 확인할 수 있을 것이다.
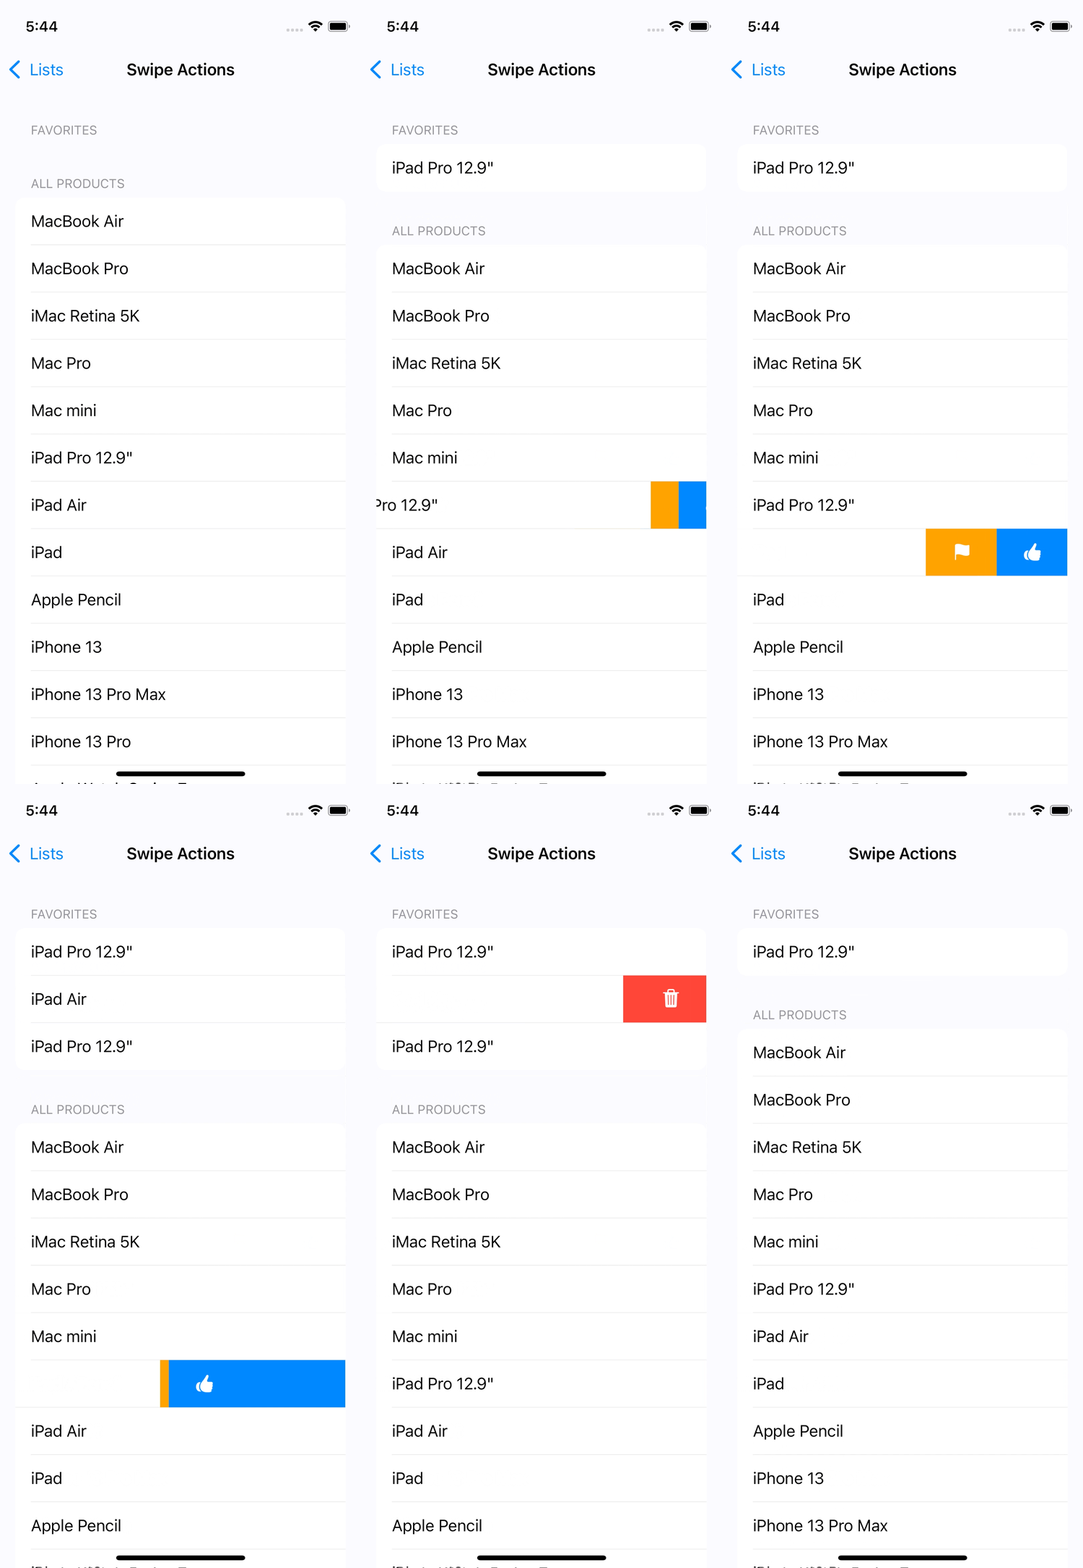
두 개의 SwipeAction이 trailing 방향에 표시되고,
FullSwipe시 첫 번째로 등록된 따봉 버튼이 작동하는 것을 확인할 수 있다.
Search
Apple Developer Documentation
developer.apple.com
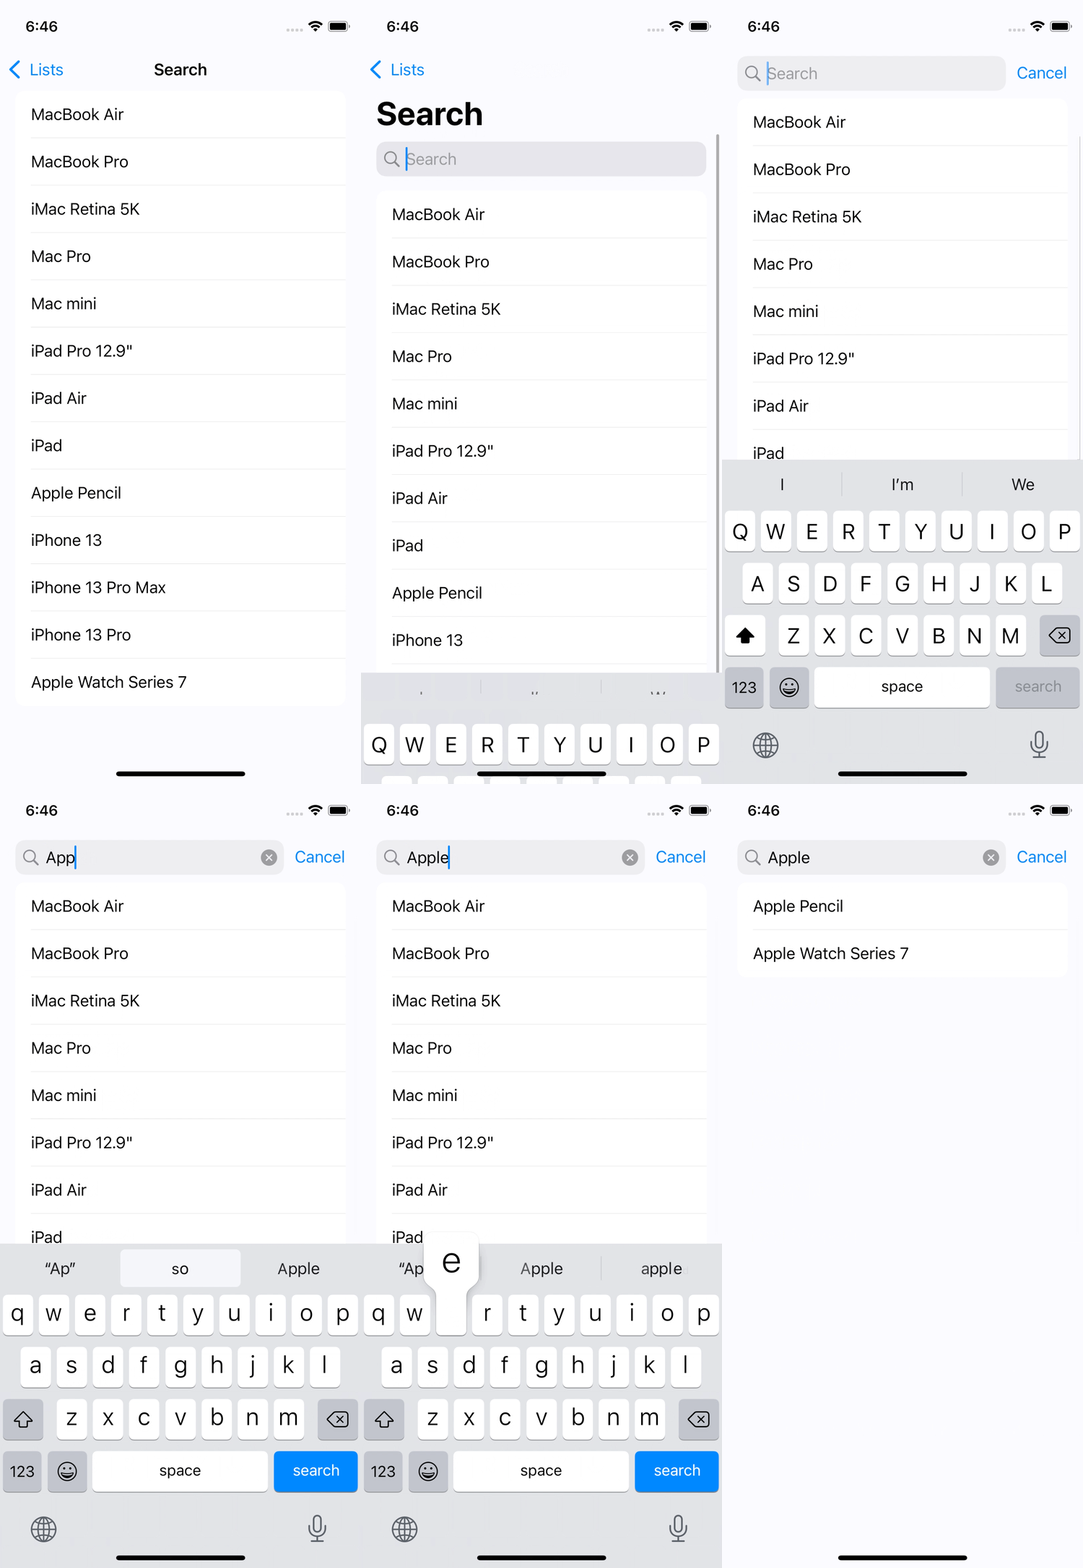
List는 항목을 나열하는 View이기 때문에 표시하는 데이터가 너무 많다면 검색 기능이 유용할 수 있다.
이를 위한 searchable modifier는 어떤 값으로 검색을 진행할 것인지, 어느 위치에 검색창을 둘 것인지를 설정할 수 있다.
struct Search: View {
    @State private var keyword = ""
    @State private var items = AppleProduct.sampleList

    var body: some View {
        List(items) { item in
            Text(item.name)
        }
        .searchable(text: $keyword)
    }
}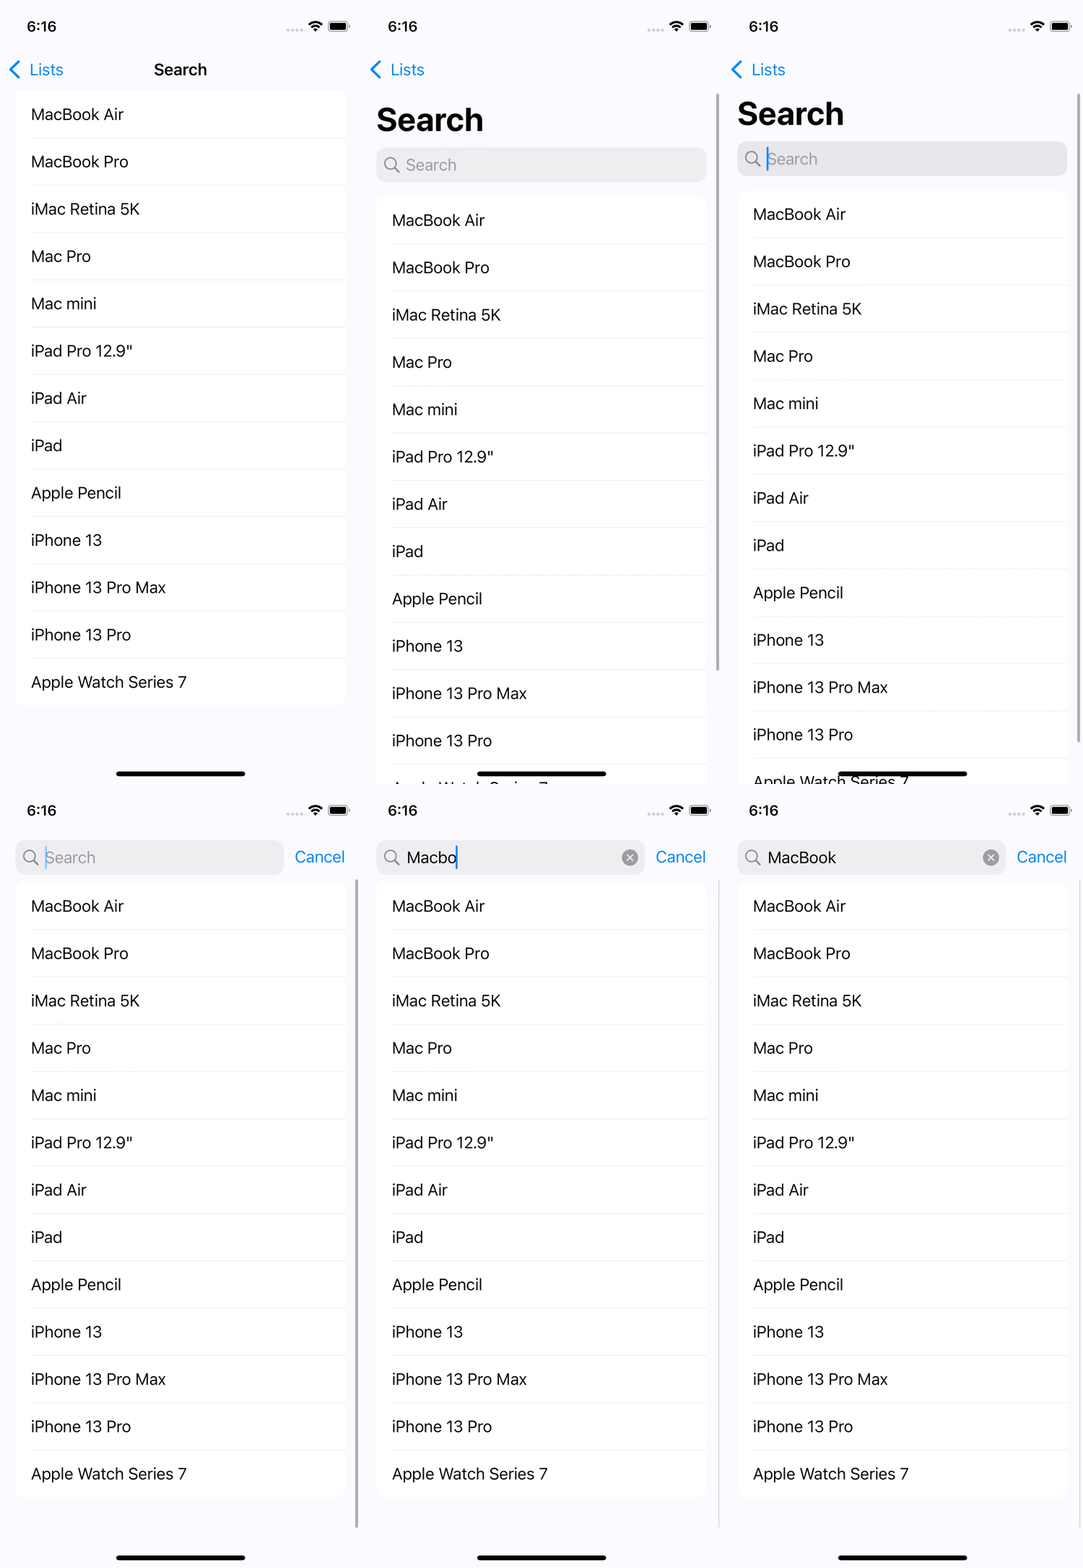
이렇게 구현한 SearchBar는 UI만 존재할 뿐 제대로 된 기능은 하지 않는다.
검색의 기능 자체는 onChange modifier에서 구현하고, 방식은 두 가지가 있다.
즉시 검색
사용자가 입력하는 즉시 결과를 반환하는 방식이다.
struct Search: View {
    @State private var keyword = ""
    @State private var items = AppleProduct.sampleList

    var body: some View {
        List(items) { item in
            Text(item.name)
        }
        .searchable(text: $keyword)
        .onChange(of: keyword) { newValue in
            if newValue.count > 0 {
                items = AppleProduct.sampleList.filter {
                    $0.name.contains(newValue)
                }
            } else {
                items = AppleProduct.sampleList
            }
        }
    }
}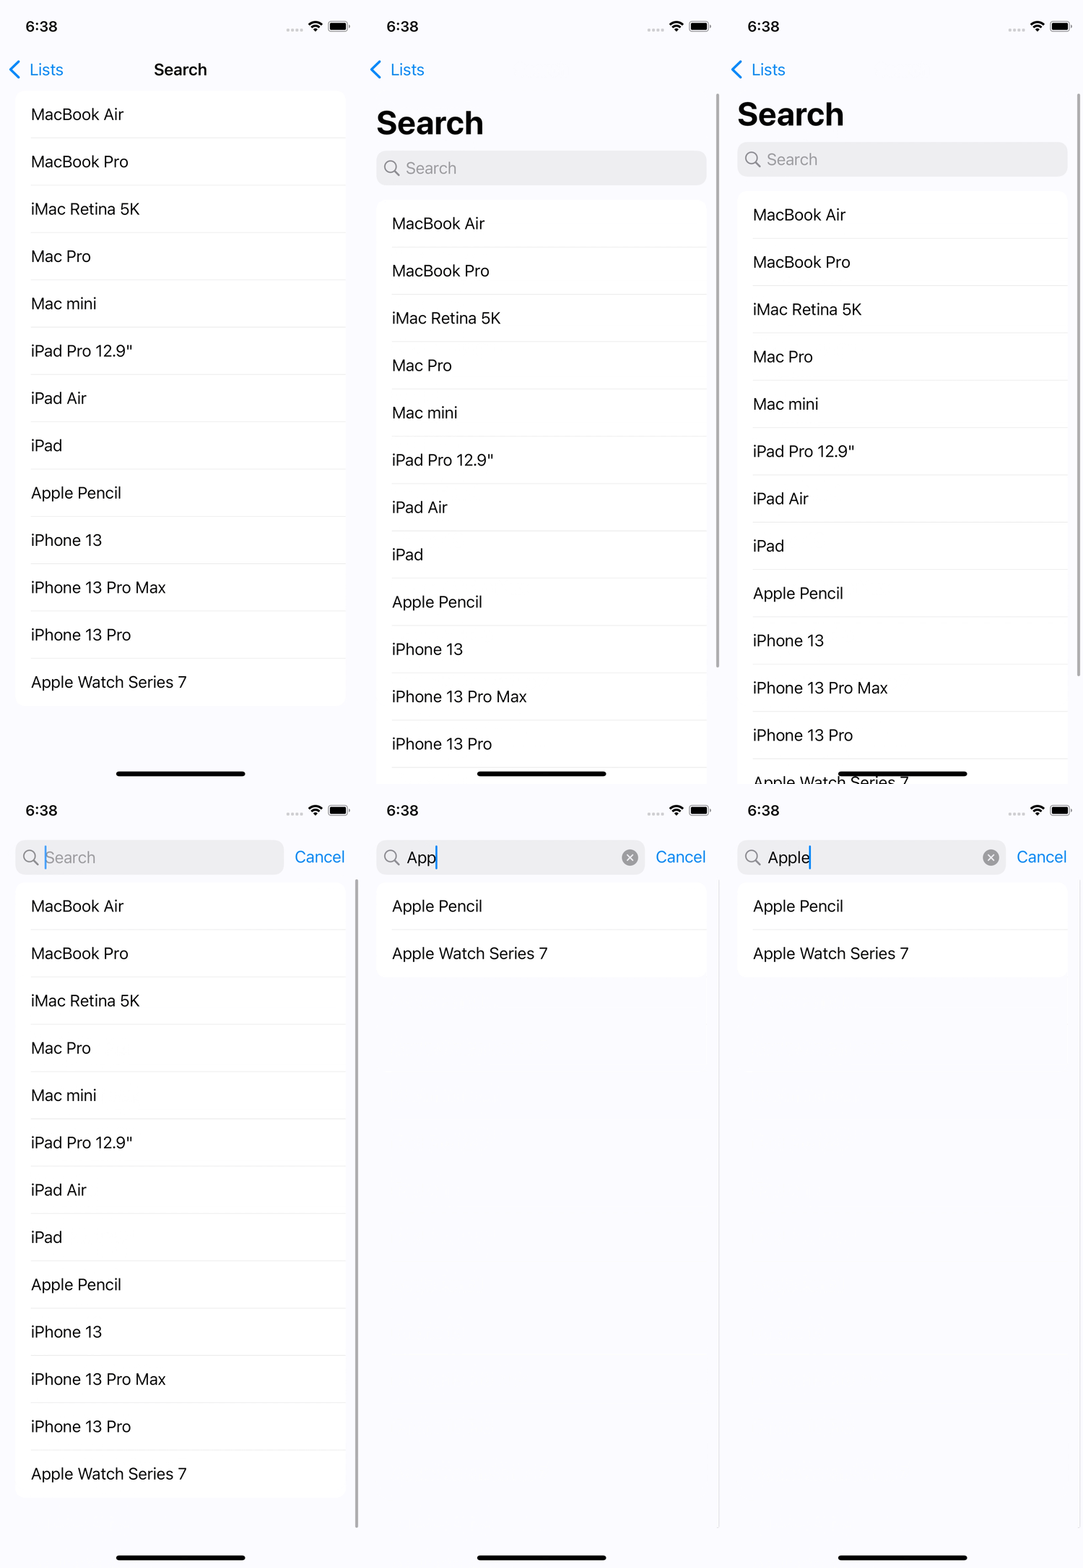
지속적으로 변하는 keyword의 글자 수에 주목해 이것이 변할 때마다 검색 결과를 표시한다.
이 방법은 즉각적인 반응을 보이지만 데이터가 너무 많은 경우 산만하다는 인식을 줄 수 있다.
Submit 검색
사용자가 입력을 마쳤을 때 검색 결과를 표시하는 방식이다.
struct Search: View {
    @State private var keyword = ""
    @State private var items = AppleProduct.sampleList

    var body: some View {
        List(items) { item in
            Text(item.name)
        }
        .searchable(text: $keyword)
        .onSubmit(of: .search) {
            if keyword.count > 0 {
                items = AppleProduct.sampleList.filter {
                    $0.name.contains(keyword)
                }
            } else {
                items = AppleProduct.sampleList
            }
        }
    }
}
Apple Developer Documentation
developer.apple.com
onSubmit을 사용해 사용자가 값을 전달(enter)했을 때
keyword의 변화를 감지하고, 결과를 표시한다.
SearchCompletion
검색어의 목록을 미리 제안하고, 이를 사용해 검색 결과를 반환한다.
.searchable(text: $keyword) {
    Text("Mac").searchCompletion("Mac")
    Label("iPhone", systemImage: "iphone").searchCompletion("iPhone")
}
Text와 Label로 주로 생성한다.
결과는 다음과 같다.

'학습 노트 > Swift UI (2022)' 카테고리의 다른 글
| 31. CoreData #1 (0) | 2022.11.16 |
|---|---|
| 30. Gesture (0) | 2022.11.16 |
| 28. ForEach & Grid (0) | 2022.11.09 |
| 27. List #2 (0) | 2022.11.09 |
| 26. List #1 (0) | 2022.11.04 |


