List #2
Selection
Apple Developer Documentation
developer.apple.com
일반 모드
struct SingleSelection: View {
    var items = AppleProduct.sampleList
    @State private var selected: AppleProduct? = nil

    var body: some View {
        VStack {
            Text("Selected item: \(selected?.name ?? "_")")

            List(items) { item in
                Button {
                    selected = item
                } label: {
                    Text(item.name)
                }
            }
        }
    }
}
일반적인 List에 Selection 기능을 구현한 경우이다.
특별한 생성자의 사용 없이 Cell에 Tab 이벤트를 인식하는 Button을 사용해 State 변수에 상태를 저장한다.
편집 모드
struct SingleSelection: View {
    var items = AppleProduct.sampleList
    @State private var selected: AppleProduct? = nil

    var body: some View {
        VStack {
            Text("Selected item: \(selected?.name ?? "_")")

            List(items, id: \.self, selection: $selected) { item in
                Text(item.name)
            }
        }
        .toolbar {
            EditButton()
        }
    }
}
EditButton을 추가해 List의 편집 모드를 토글 한다.
생성자의 Selection 파라미터를 Binding 변수로 전달하고, id 파라미터를 추가해 표시되는 항목 전체를 구분할 수 있도록 한다.
해당 방식은 List에 표시되는 항목을 Button 등의 Tap 이벤트를 처리하는 View를 사용할 이유가 사라진 다는 데 있다.
MultiSelection
일반 모드
struct MultiSelection: View {
    var items = AppleProduct.sampleList
    @State private var selectedNormal: Set<AppleProduct> = []

    var body: some View {
        VStack {
            Text("\(selectedNormal.count) item(s) selected")
                .font(.title)

            List(items, selection: $selectedNormal) { item in
                Button {
                    if selectedNormal.contains(item) {
                        selectedNormal.remove(item)
                    } else {
                        selectedNormal.insert(item)
                    }
                } label: {
                    if selectedNormal.contains(item) {
                        HStack {
                            Label(item.name, systemImage: "checkmark")
                        }
                    } else {
                        Text(item.name)
                    }
                }
            }
        }
    }
}
마찬가지로 Button으로 Cell을 구성하되,
생성자의 Selection 파라미터에 Set 형식의 State 변수를 Binding으로 전달한다.
Cell을 선택하면 Set에 이미 존재하는 항목인지에 따라 이를 추가하거나 제거하고,
Set의 원소 수를 세어 상단에 표기한다.
편집 모드
struct MultiSelection: View {
    var items = AppleProduct.sampleList
    @State private var selected: Set<AppleProduct> = []

    var body: some View {
        VStack {
            Text("\(selected.count) item(s) selected")
                .font(.title)

            List(items, id: \.self, selection: $selected) { item in
                Text(item.name)
            }
        }
        .toolbar {
            EditButton()
        }
    }
}
EditButton을 통해 List의 편집 모드를 토글 한다.
일반 모드를 구현했을 때와는 다르게 생성자의 Selection 파라미터에 Set 형식의 State 변수를 Binding으로 전달하는 것 만으로,
항목을 추가하고, 제거하는 모든 것을 List가 자동으로 구현한다.
EditMode
삭제
struct EditMode: View {
    @State private var items = AppleProduct.sampleList

    var body: some View {
        VStack {
            List {
                ForEach(items) { item in
                    Text(item.name)
                }
                .onDelete { row in
                    items.remove(atOffsets: row)
                }
            }
        }
        .toolbar {
            EditButton()
        }
    }
}
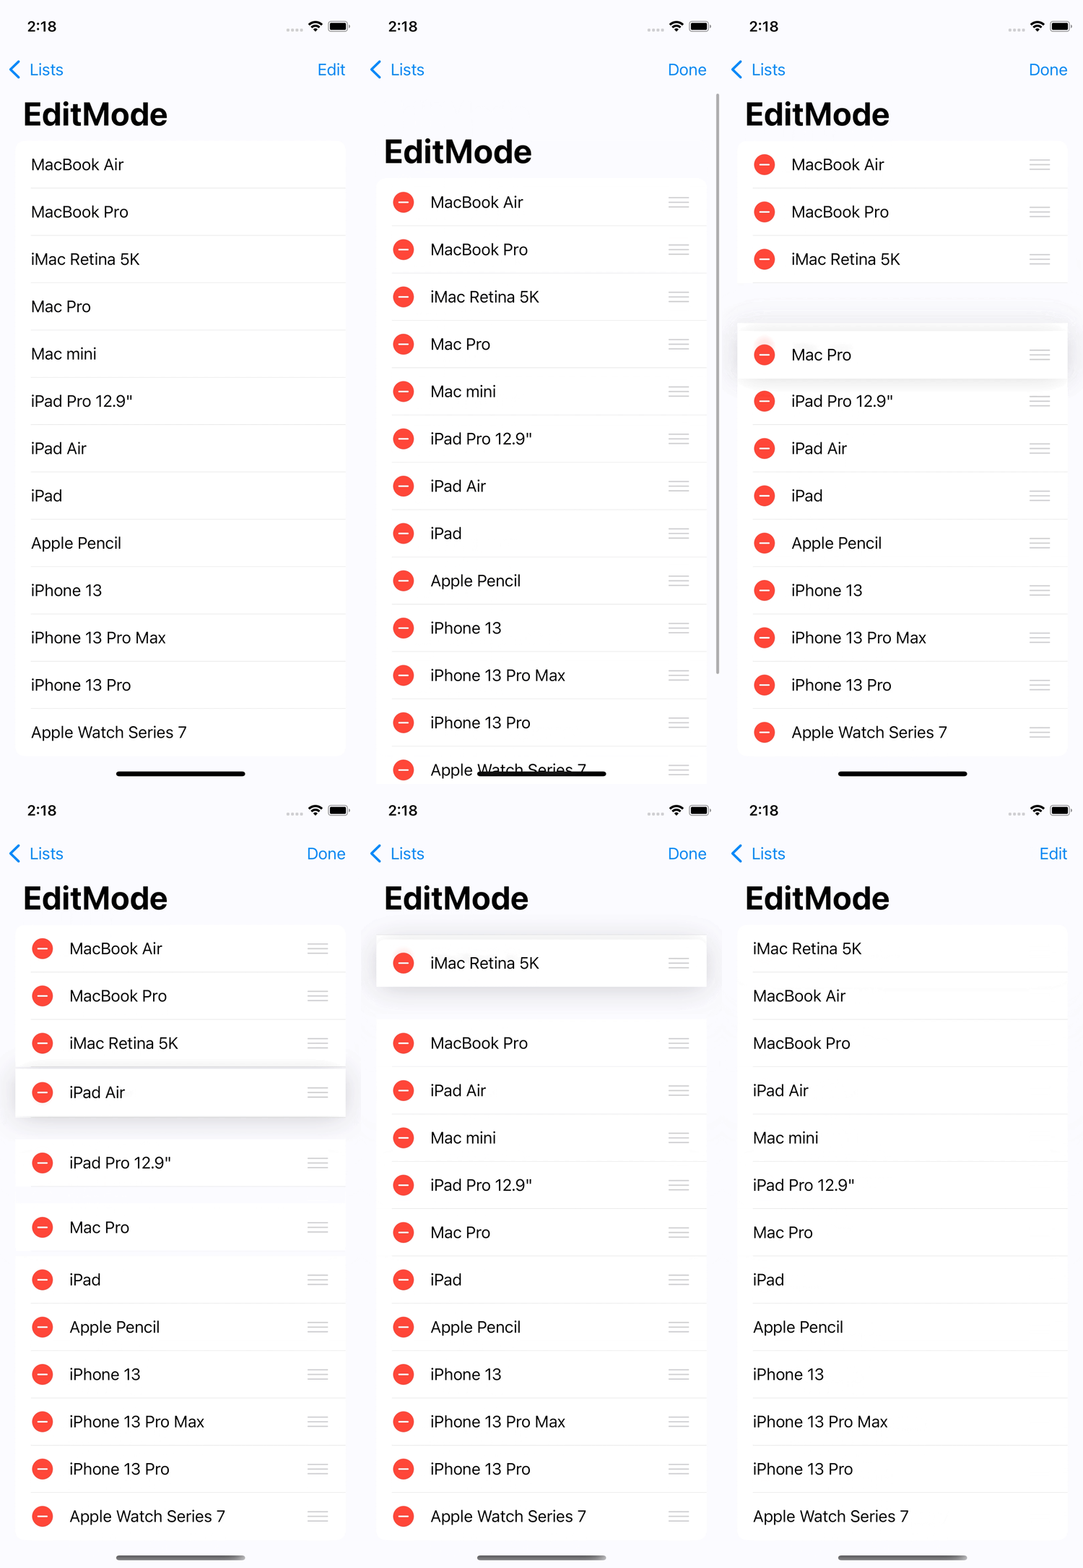
Cell의 삭제는 List 자체로는 구현이 불가능하다.
때문에 ForEach의 도움을 받게 되는데, 간단하게 List에 표시할 항목을 ForEach에 전달하는 것으로 끝난다.
onDelete의 Closure로 전달되는 파라미터로 삭제할 Cell의 위치를 판단하며,
해당 파라미터를 remove(atOffsets:) 메서드에 전달해 삭제한다.
SwiftUI의 View는 전부 구조체이고, 구조체는 전부 값 형식이기 때문에 수정이 불가능하다.
따라서 삭제되고, 추가되는 기능의 구현을 위해서는 List에 표시되는 데이터들은 State 변수여야 함에 주의하자.
Cell 이동
struct EditMode: View {
    @State private var items = AppleProduct.sampleList

    var body: some View {
        VStack {
            List {
                ForEach(items) { item in
                    Text(item.name)
                }
                .onDelete { row in
                    items.remove(atOffsets: row)
                }
                .onMove(perform: move)
            }
        }
        .toolbar {
            EditButton()
        }
    }

    func move(from: IndexSet, to: Int) {
        items.move(fromOffsets: from, toOffset: to)
    }
}
이동 기능은 onMove를 사용한다.
Closure로 전달되는 indexSet에는 선택한 위치와 이동된 위치가 포함돼 있어,
이를 사용해 move 메서드를 호출하기만 하면 된다.
'학습 노트 > Swift UI (2022)' 카테고리의 다른 글
| 29. List의 부가 기능 구현하기 (0) | 2022.11.10 |
|---|---|
| 28. ForEach & Grid (0) | 2022.11.09 |
| 26. List #1 (0) | 2022.11.04 |
| 25. StateObject (0) | 2022.11.02 |
| 24. Observable Object & Environment Object (0) | 2022.11.01 |


