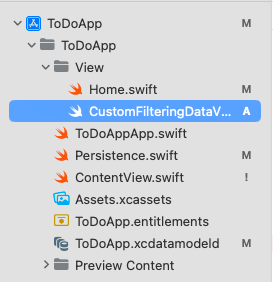
프로젝트 구성


Coredata는 위와 같이 수정한다.
완료 여부를 판단할 isCompleted, 할 일의 정보를 저장할 각각의 속성이다.
// 수정 전

import CoreData

struct PersistenceController {
    static let shared = PersistenceController()

    static var preview: PersistenceController = {
        let result = PersistenceController(inMemory: true)
        let viewContext = result.container.viewContext
        for _ in 0..<10 {
            let newItem = Item(context: viewContext)
            newItem.timestamp = Date()
        }
        do {
            try viewContext.save()
        } catch {
            // Replace this implementation with code to handle the error appropriately.
            // fatalError() causes the application to generate a crash log and terminate. You should not use this function in a shipping application, although it may be useful during development.
            let nsError = error as NSError
            fatalError("Unresolved error \(nsError), \(nsError.userInfo)")
        }
        return result
    }()

    let container: NSPersistentContainer

    init(inMemory: Bool = false) {
        container = NSPersistentContainer(name: "ToDoApp")
        if inMemory {
            container.persistentStoreDescriptions.first!.url = URL(fileURLWithPath: "/dev/null")
        }
        container.loadPersistentStores(completionHandler: { (storeDescription, error) in
            if let error = error as NSError? {
                // Replace this implementation with code to handle the error appropriately.
                // fatalError() causes the application to generate a crash log and terminate. You should not use this function in a shipping application, although it may be useful during development.

                /*
                 Typical reasons for an error here include:
                 * The parent directory does not exist, cannot be created, or disallows writing.
                 * The persistent store is not accessible, due to permissions or data protection when the device is locked.
                 * The device is out of space.
                 * The store could not be migrated to the current model version.
                 Check the error message to determine what the actual problem was.
                 */
                fatalError("Unresolved error \(error), \(error.userInfo)")
            }
        })
        container.viewContext.automaticallyMergesChangesFromParent = true
    }
}
// 수정 후
import CoreData
struct PersistenceController {
static let shared = PersistenceController()
static var preview: PersistenceController = {
let result = PersistenceController(inMemory: true)
let viewContext = result.container.viewContext
do {
try viewContext.save()
} catch {
// Replace this implementation with code to handle the error appropriately.
// fatalError() causes the application to generate a crash log and terminate. You should not use this function in a shipping application, although it may be useful during development.
let nsError = error as NSError
fatalError("Unresolved error \(nsError), \(nsError.userInfo)")
}
return result
}()
let container: NSPersistentContainer
init(inMemory: Bool = false) {
container = NSPersistentContainer(name: "ToDoApp")
if inMemory {
container.persistentStoreDescriptions.first!.url = URL(fileURLWithPath: "/dev/null")
}
container.loadPersistentStores(completionHandler: { (storeDescription, error) in
if let error = error as NSError? {
// Replace this implementation with code to handle the error appropriately.
// fatalError() causes the application to generate a crash log and terminate. You should not use this function in a shipping application, although it may be useful during development.
/*
Typical reasons for an error here include:
* The parent directory does not exist, cannot be created, or disallows writing.
* The persistent store is not accessible, due to permissions or data protection when the device is locked.
* The device is out of space.
* The store could not be migrated to the current model version.
Check the error message to determine what the actual problem was.
*/
fatalError("Unresolved error \(error), \(error.userInfo)")
}
})
container.viewContext.automaticallyMergesChangesFromParent = true
}
}CoreData를 사용하도록 프로젝트를 생성하면서 자동으로 작성된 코드에서 불필요한 부분을 덜어낸다.
삭제된 부분은 데모용 코드로 임의의 10개의 데이터를 생성하는 코드이다.
// 수정 전

import SwiftUI
import CoreData

struct ContentView: View {
    @Environment(\.managedObjectContext) private var viewContext

    @FetchRequest(
        sortDescriptors: [NSSortDescriptor(keyPath: \Item.timestamp, ascending: true)],
        animation: .default)
    private var items: FetchedResults<Item>

    var body: some View {
        NavigationView {
            List {
                ForEach(items) { item in
                    NavigationLink {
                        Text("Item at \(item.timestamp!, formatter: itemFormatter)")
                    } label: {
                        Text(item.timestamp!, formatter: itemFormatter)
                    }
                }
                .onDelete(perform: deleteItems)
            }
            .toolbar {
#if os(iOS)
                ToolbarItem(placement: .navigationBarTrailing) {
                    EditButton()
                }
#endif
                ToolbarItem {
                    Button(action: addItem) {
                        Label("Add Item", systemImage: "plus")
                    }
                }
            }
            Text("Select an item")
        }
    }

    private func addItem() {
        withAnimation {
            let newItem = Item(context: viewContext)
            newItem.timestamp = Date()

            do {
                try viewContext.save()
            } catch {
                // Replace this implementation with code to handle the error appropriately.
                // fatalError() causes the application to generate a crash log and terminate. You should not use this function in a shipping application, although it may be useful during development.
                let nsError = error as NSError
                fatalError("Unresolved error \(nsError), \(nsError.userInfo)")
            }
        }
    }

    private func deleteItems(offsets: IndexSet) {
        withAnimation {
            offsets.map { items[$0] }.forEach(viewContext.delete)

            do {
                try viewContext.save()
            } catch {
                // Replace this implementation with code to handle the error appropriately.
                // fatalError() causes the application to generate a crash log and terminate. You should not use this function in a shipping application, although it may be useful during development.
                let nsError = error as NSError
                fatalError("Unresolved error \(nsError), \(nsError.userInfo)")
            }
        }
    }
}

private let itemFormatter: DateFormatter = {
    let formatter = DateFormatter()
    formatter.dateStyle = .short
    formatter.timeStyle = .medium
    return formatter
}()

#Preview {
    ContentView().environment(\.managedObjectContext, PersistenceController.preview.container.viewContext)
}
// 수정 후
import SwiftUI
struct ContentView: View {
var body: some View {
}
}
#Preview {
ContentView()
}데모용 UI를 표시하던 ContentView도 정리해 준다.

새롭게 HomeView를 생성한다.
import SwiftUI

struct Home: View {
    var body: some View {
        Text("Hello, World!")
    }
}

#Preview {
    ContentView()
}
해당 View에 실질적인 UI를 구성하게 된다.
import SwiftUI

struct ContentView: View {
    var body: some View {
        NavigationStack {
            Home()
                .navigationTitle("To-Do")
        }
    }
}

#Preview {
    ContentView()
}
ContentView는 NavigationStack을 사용해 Home을 화면에 표시한다.
NavigationStack은 iOS16 이상부터 사용할 수 있는 NavigationView의 새로운 이름이다.
일반적으로 사용하는데 기능상의 큰 차이는 없으므로 위와 같이 NavigationView의 제목을 지정하는 방법도 동일하다.
import SwiftUI

struct Home: View {
    @Environment(\.self) private var env
    @State private var filterDate: Date = .init()

    var body: some View {
        List {

        }
    }
}

#Preview {
    ContentView()
}
CoreData를 사용하기 위해 Environment 프로퍼티를 추가하고, 정렬과 검색에 사용하기 위한 Date 형식의 변수도 추가한다.
import SwiftUI

@main
struct ToDoAppApp: App {
    let persistenceController = PersistenceController.shared

    var body: some Scene {
        WindowGroup {
            ContentView()
                .environment(\.managedObjectContext, persistenceController.container.viewContext)
        }
    }
}
@Environment를 사용해 간단하게 CoreData 사용이 가능한 이유는 CreData를 사용하도록 프로젝트를 생성하면서
자동으로 App.swift에 environment를 전달하도록 되어있기 때문임을 알아두자.

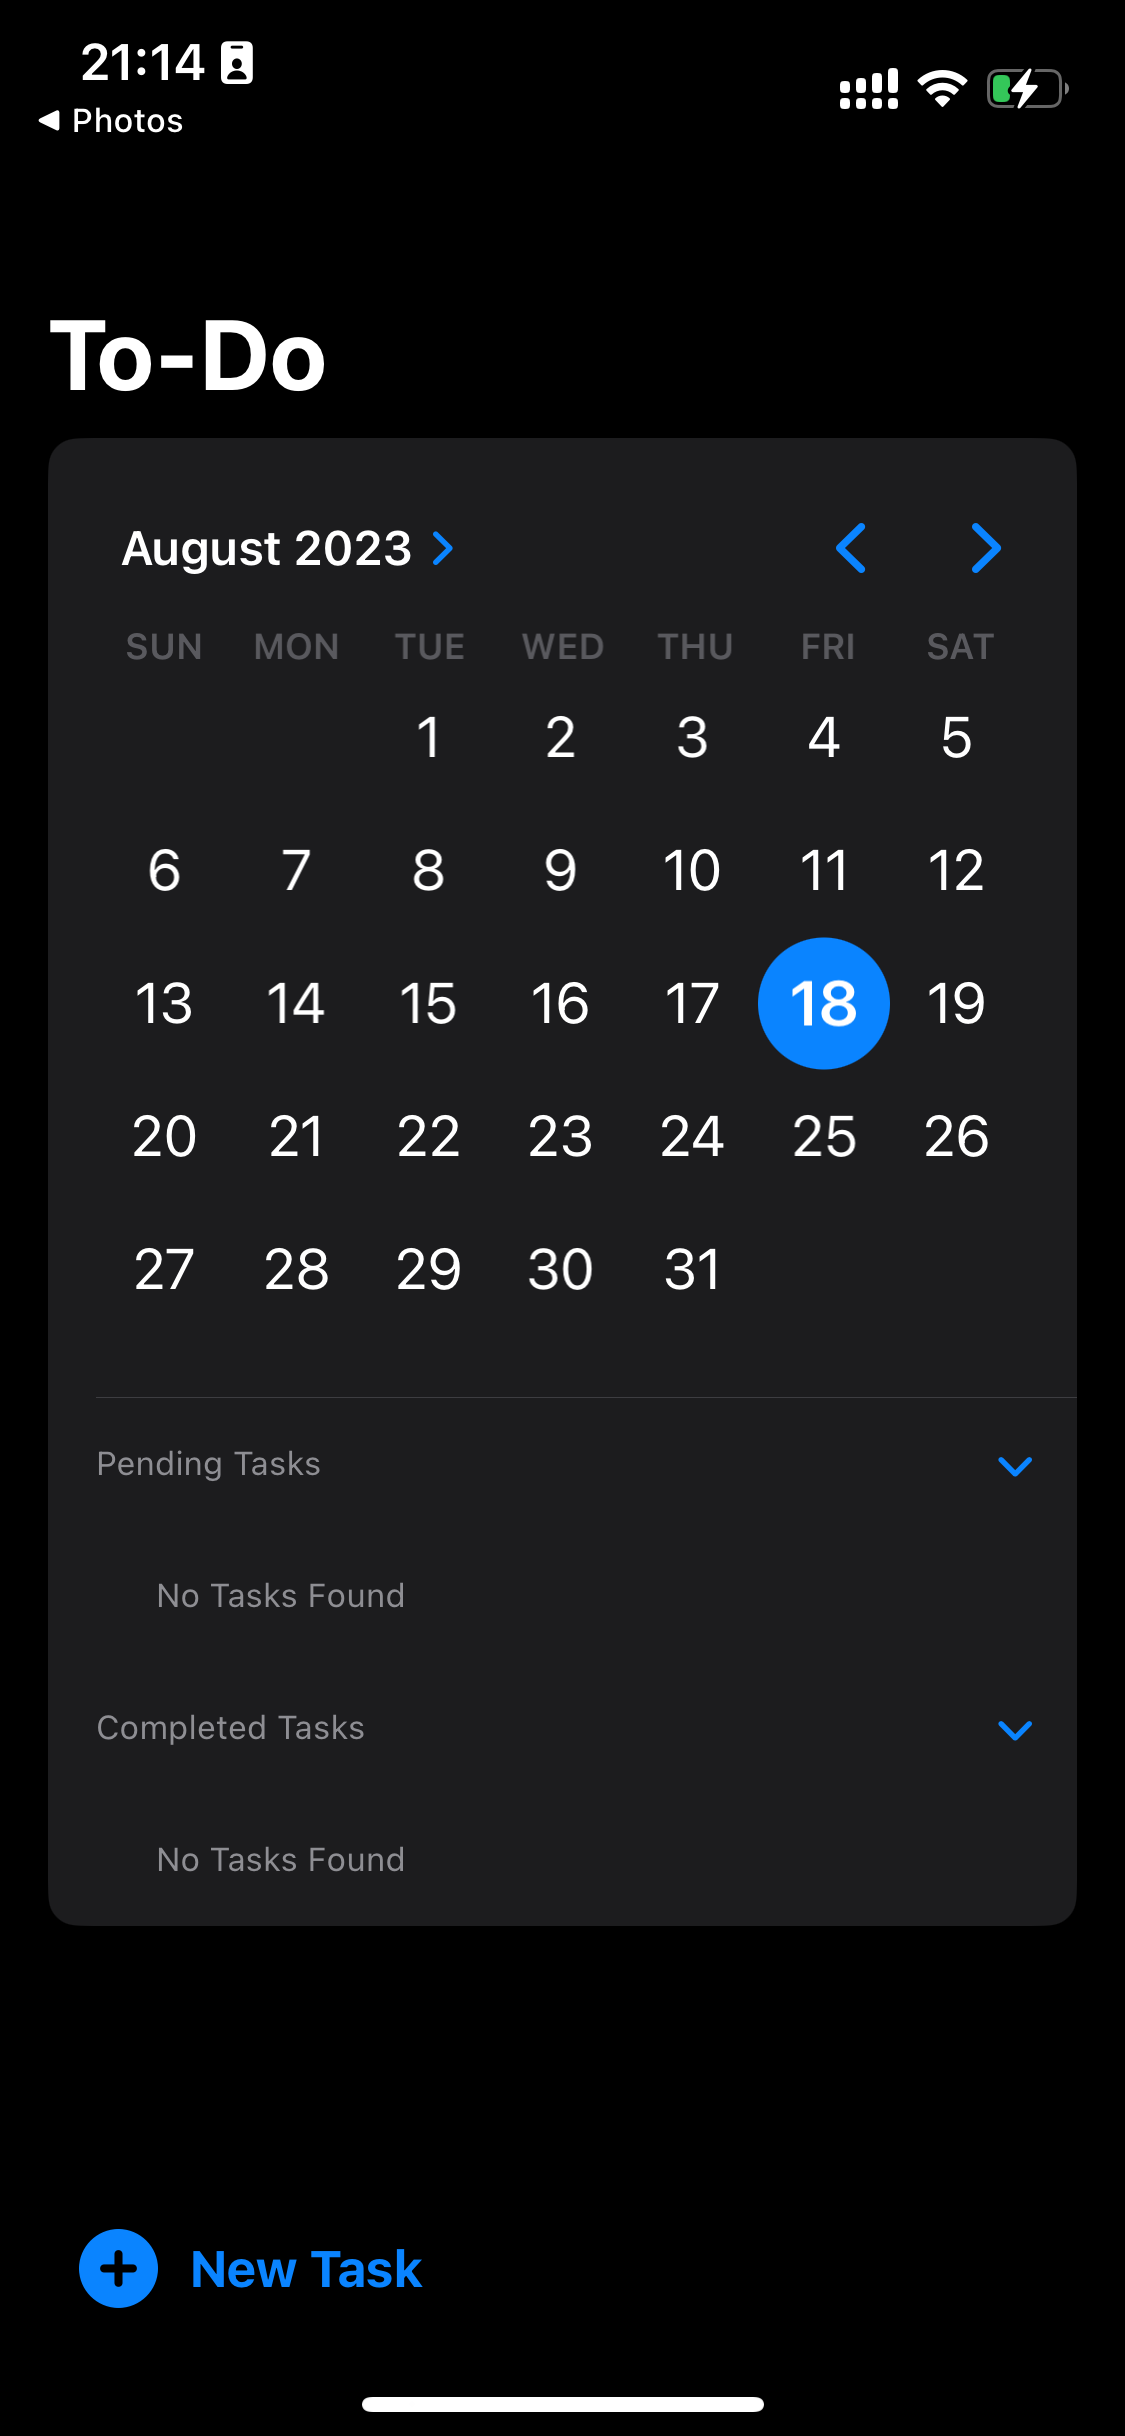
현재까지의 상황은 위와 같다.
빈 화면처럼 보이고 실제로도 빈 화면이지만 NavigationTitle이 잘 적용됐고, ListView도 잘 표시되고 있다.
UI 구현
// Home.swift

import SwiftUI

struct Home: View {
    @Environment(\.self) private var env
    @State private var filterDate: Date = .init()

    var body: some View {
        List {
            DatePicker(selection: $filterDate, displayedComponents: [.date]) {

            }
            .labelsHidden()
            .datePickerStyle(.graphical)
        }
    }
}

#Preview {
    ContentView()
}
날짜를 선택하기 위한 DatePicker를 사용하는 방법은 간단하다.
선택한 날짜를 저장하기 위해 selection에 Binding 형태로 변수를 전달하고,
표시할 정보와 방식을 지정하기만 하면 된다.
labelsHIdden으로 제목란을 없애고, dataPickerStyle를 graphical로 변경해 달력의 형태로 표시되도록 했다.
DatePicker | Apple Developer Documentation
A control for selecting an absolute date.
developer.apple.com
DatePickerStyle | Apple Developer Documentation
A type that specifies the appearance and interaction of all date pickers within a view hierarchy.
developer.apple.com
더 자세한 내용은 공식 문서를 통해 확인할 수 있다.

// Home.swift

import SwiftUI

struct Home: View {
    @Environment(\.self) private var env
    @State private var filterDate: Date = .init()
    @State private var showPendingTasks: Bool = true
    @State private var showCompletedTasks: Bool = true

    var body: some View {
        List {
            DatePicker(selection: $filterDate, displayedComponents: [.date]) {

            }
            .labelsHidden()
            .datePickerStyle(.graphical)

            DisclosureGroup(isExpanded: $showPendingTasks) {

            } label: {
                Text("Pending Tasks")
                    .font(.caption)
                    .foregroundStyle(.gray)
            }

            DisclosureGroup(isExpanded: $showCompletedTasks) {

            } label: {
                Text("Completed Tasks")
                    .font(.caption)
                    .foregroundStyle(.gray)
            }

        }
    }
}

#Preview {
    ContentView()
}
그 아래에는 이렇게 DisclosureGroup을 추가한다.
DisclosureGroup은 접었다 폈다 할 수 있는 목차를 제공하고, 각각 진행 중인 목록, 완료된 목록을 표시하게 될 예정이다.
새로운 파일을 생성한다.
// CustomFilteringDataView.swift

import SwiftUI

struct CustomFilteringDataView<Content: View>: View {
    var content: (Task) -> Content

    init(displayPendingTask: Bool, filterDate: Date, content: @escaping (Task) -> Content) {

    }

    var body: some View {
        Text("Hello, World!")
    }
}

#Preview {
    ContentView()
}
새롭게 만든 CustomFilteringDataView는 Generic 타입을 가진 View로, Content의 형식은 View로, Task를 전달받아 생성된다.
CustomFilteringDataView 내의 생성자에 의해 조건에 따라 Task 데이터를 필터링하고, 이를 사용해 Content View를 생성하게 된다.
따라서 생성자 안에서 Task의 검색을 위한 Predicate를 정의한다.
// CustomFilteringDataView.swift

import SwiftUI

struct CustomFilteringDataView<Content: View>: View {
    var content: (Task) -> Content

    init(displayPendingTask: Bool, filterDate: Date, content: @escaping (Task) -> Content) {
        let calendar = Calendar.current
        let startOfDay = calendar.startOfDay(for: filterDate)
        let endOfDay = calendar.date(bySettingHour: 23, minute: 59, second: 59, of: startOfDay)!

        let predicate = NSPredicate(format: "date >= %@ AND date <= %@ AND isCompleted == %i", (startOfDay as NSDate), (endOfDay as NSDate), (!displayPendingTask))
    }
    var body: some View {
        Text("Hello, World!")
    }
}

#Preview {
    ContentView()
}
iOS의 날짜체계를 사용하기 위해 Calendar를 불러오고, 해당 일자의 시작과 끝을 지정한다.
NSPredicate는 데이터의 필터링에 자주 쓰이는 정규식 형태의 문장이다.
별도의 문법을 가지고 있으므로 문서와 여러 예시들을 참고하는 것이 좋다.
참고
NSPredicate | Apple Developer Documentation
A definition of logical conditions for constraining a search for a fetch or for in-memory filtering.
developer.apple.com
191. Predicate Syntax
Predicate Syntax NSPredicate(format: String, arguments: CVaListPointer) NSPredicate(format: "target LIKE %@", "value") 여러 생성자 중 위의 생성자의 사용 빈도가 가장 높다. pram1 : Format 문자열 : 해당 문자열을 사용해 검색
chillog.page
// CustomFilteringDataView.swift

import SwiftUI

struct CustomFilteringDataView<Content: View>: View {
    var content: (Task) -> Content
    @FetchRequest private var result: FetchedResults<Task>

    init(displayPendingTask: Bool, filterDate: Date, content: @escaping (Task) -> Content) {
        let calendar = Calendar.current
        let startOfDay = calendar.startOfDay(for: filterDate)
        let endOfDay = calendar.date(bySettingHour: 23, minute: 59, second: 59, of: startOfDay)!

        let predicate = NSPredicate(format: "date >= %@ AND date <= %@ AND isCompleted == %i", (startOfDay as NSDate), (endOfDay as NSDate), (!displayPendingTask))

        _result = FetchRequest(entity: Task.entity(), sortDescriptors: [NSSortDescriptor(keyPath: \Task.date, ascending: false)], predicate: predicate, animation: .easeInOut(duration: 0.25))

        self.content = content
    }

    var body: some View {
        Text("Hello, World!")
    }
}

#Preview {
    ContentView()
}
작성된 predicate는 CoreData에서 데이터를 가져오기 위해 FetchRequest에 사용된다.
결과는 생성자 파라미터의 escape 시퀀스에 의해 content 변수에 저장된다.
// CustomFilteringDataView.swift

import SwiftUI

struct CustomFilteringDataView<Content: View>: View {
    var content: (Task) -> Content
    @FetchRequest private var result: FetchedResults<Task>

    init(displayPendingTask: Bool, filterDate: Date, content: @escaping (Task) -> Content) {
        let calendar = Calendar.current
        let startOfDay = calendar.startOfDay(for: filterDate)
        let endOfDay = calendar.date(bySettingHour: 23, minute: 59, second: 59, of: startOfDay)!

        let predicate = NSPredicate(format: "date >= %@ AND date <= %@ AND isCompleted == %i", (startOfDay as NSDate), (endOfDay as NSDate), (!displayPendingTask))

        _result = FetchRequest(entity: Task.entity(), sortDescriptors: [NSSortDescriptor(keyPath: \Task.date, ascending: false)], predicate: predicate, animation: .easeInOut(duration: 0.25))

        self.content = content
    }

    var body: some View {
        Group {
            if result.isEmpty {
                Text("No Tasks Found")
                    .font(.caption)
                    .foregroundStyle(.gray)
                    .listRowSeparator(.hidden)
            } else {
                ForEach(result) {
                    content($0)
                }
            }
        }
    }
}

#Preview {
    ContentView()
}
결과가 비었다면 해당하는 Text를 표시하고, 존재한다면 ForEach를 사용해 순회하며 데이터를 표시한다.
// Home.swift

import SwiftUI

struct Home: View {
    @Environment(\.self) private var env
    @State private var filterDate: Date = .init()
    @State private var showPendingTasks: Bool = true
    @State private var showCompletedTasks: Bool = true

    var body: some View {
        List {
            DatePicker(selection: $filterDate, displayedComponents: [.date]) {

            }
            .labelsHidden()
            .datePickerStyle(.graphical)

            DisclosureGroup(isExpanded: $showPendingTasks) {
                CustomFilteringDataView(displayPendingTask: true, filterDate: filterDate) {
                    TaskRow(task: $0)
                }
            } label: {
                Text("Pending Tasks")
                    .font(.caption)
                    .foregroundStyle(.gray)
            }

            DisclosureGroup(isExpanded: $showCompletedTasks) {

            } label: {
                Text("Completed Tasks")
                    .font(.caption)
                    .foregroundStyle(.gray)
            }

        }
    }
}

#Preview {
    ContentView()
}

struct TaskRow: View {
    var task: Task

    var body: some View {
        HStack {

        }
    }
}
Home의 DisclosureGroup에서 새로 만든 CustomFilteringDataView를 호출하고,
결괏값들을 TaskRow에 전달해 출력하도록 한다.
// Home.swift

import SwiftUI

struct Home: View {
    @Environment(\.self) private var env
    @State private var filterDate: Date = .init()
    @State private var showPendingTasks: Bool = true
    @State private var showCompletedTasks: Bool = true

    var body: some View {
        List {
            DatePicker(selection: $filterDate, displayedComponents: [.date]) {

            }
            .labelsHidden()
            .datePickerStyle(.graphical)

            DisclosureGroup(isExpanded: $showPendingTasks) {
                CustomFilteringDataView(displayPendingTask: true, filterDate: filterDate) {
                    TaskRow(task: $0)
                }
            } label: {
                Text("Pending Tasks")
                    .font(.caption)
                    .foregroundStyle(.gray)
            }

            DisclosureGroup(isExpanded: $showCompletedTasks) {
                CustomFilteringDataView(displayPendingTask: false, filterDate: filterDate) {
                    TaskRow(task: $0)
                }
            } label: {
                Text("Completed Tasks")
                    .font(.caption)
                    .foregroundStyle(.gray)
            }

        }
    }
}

#Preview {
    ContentView()
}

struct TaskRow: View {
    var task: Task

    var body: some View {
        HStack {

        }
    }
}
CompletedTask도 같은 방식으로 displayPendingTask 파라미터만 뒤집어 전달하면 된다.

현재 등록된 Task가 존재하지 않기 때문에 'No Tasks Found'가 잘 표시되고 있다.
// Home.swift

import SwiftUI

struct Home: View {
    @Environment(\.self) private var env
    @State private var filterDate: Date = .init()
    @State private var showPendingTasks: Bool = true
    @State private var showCompletedTasks: Bool = true

    var body: some View {
        List {
            DatePicker(selection: $filterDate, displayedComponents: [.date]) {

            }
            .labelsHidden()
            .datePickerStyle(.graphical)

            DisclosureGroup(isExpanded: $showPendingTasks) {
                CustomFilteringDataView(displayPendingTask: true, filterDate: filterDate) {
                    TaskRow(task: $0)
                }
            } label: {
                Text("Pending Tasks")
                    .font(.caption)
                    .foregroundStyle(.gray)
            }

            DisclosureGroup(isExpanded: $showCompletedTasks) {
                CustomFilteringDataView(displayPendingTask: false, filterDate: filterDate) {
                    TaskRow(task: $0)
                }
            } label: {
                Text("Completed Tasks")
                    .font(.caption)
                    .foregroundStyle(.gray)
            }
        }
        .toolbar {
            ToolbarItem(placement: .bottomBar) {
                Button {

                } label: {
                    HStack {
                        Image(systemName: "plus.circle.fill")
                            .font(.title3)

                        Text("New Task")
                    }
                    .fontWeight(.bold)
                }
                .frame(maxWidth: .infinity, alignment: .leading)

            }
        }
    }
}

#Preview {
    ContentView()
}

struct TaskRow: View {
    var task: Task

    var body: some View {
        HStack {

        }
    }
}
새 일정을 추가하기 위한 버튼은 toolbar로 구현했다.
// Home.swift

struct TaskRow: View {
    var task: Task
    var isPendingTask: Bool
    @Environment(\.self) private var env
    @FocusState private var showKeyboard: Bool

    var body: some View {
        HStack(spacing: 12) {
            Button {

            } label: {
                Image(systemName: task.isCompleted ? "checkmark.circle.fill" : "circle")
                    .font(.title)
                    .foregroundStyle(.blue)
            }

            VStack(alignment: .leading, spacing: 4) {
                TextField("Task Title", text: .init(get: {
                    return task.title ?? ""
                }, set: { value in
                    task.title = value
                }))
                .focused($showKeyboard)

                DatePicker(selection: .init(get: {
                    return task.date ?? .init()
                }, set: { value in
                    task.date = value
                }), displayedComponents: .hourAndMinute) {

                }
                .labelsHidden()
            }
            .frame(maxWidth: .infinity, alignment: .leading)
        }
        .onAppear {
            if (task.title ?? "").isEmpty {
                showKeyboard = true
            }
        }
    }
}
공란이었던 TaskRow의 UI를 구성한다.
TextField("Task Title", text: .init(get: {
    return task.title ?? ""
}, set: { value in
    task.title = value
}))
주의해서 볼 부분은 이곳이다.
TextField | Apple Developer Documentation
A control that displays an editable text interface.
developer.apple.com
사용한 TextField의 생성자는 TextField(titleKey:text:)로, titleKey에 placeholder로 사용할 문자열을,
text에 입력된 값을 저장할 Binding 변수를 전달하도록 되어있다.
이를 구현하는 방식은 여러 가지가 있겠지만 CustomBinding을 사용하는 방식은 처음 접해보기에 한 번 정리하고 넘어가도록 하자.
init(get:set:)은 이 CustomBinding에 해당하는 생성자로, Closure를 사용하여 Binding 변수를 정의한다.
get으로는 Binding 된 속성을 가져오며, 코드에서는 task.title을 반환하고, 존재하지 않는다면 공백을 반환한다.
set으로는 새로운 값이 TextField에 입력될 때마다 호출돼, 입력된 값 즉 value를 사용해 task.title을 업데이트한다.
즉, 정리하면 task의 title 속성을 TextField와 바인딩해 사용자가 TextField에 작성하는 내용을 task.title에 반영함과 동시에 변경된 task.title 값을 TextField에 표시한다.
이러한 테크닉은 Binding을 사용하는 곳에 두루 사용할 수 있는 것으로 보인다.
// Home.swift

struct Home: View {
    @Environment(\.self) private var env
    @State private var filterDate: Date = .init()
    @State private var showPendingTasks: Bool = true
    @State private var showCompletedTasks: Bool = true

    var body: some View {
        List {
            DatePicker(selection: $filterDate, displayedComponents: [.date]) {

            }
            .labelsHidden()
            .datePickerStyle(.graphical)

            DisclosureGroup(isExpanded: $showPendingTasks) {
                CustomFilteringDataView(displayPendingTask: true, filterDate: filterDate) {
                    TaskRow(task: $0, isPendingTask: true)
                }
            } label: {
                Text("Pending Tasks")
                    .font(.caption)
                    .foregroundStyle(.gray)
            }

            DisclosureGroup(isExpanded: $showCompletedTasks) {
                CustomFilteringDataView(displayPendingTask: false, filterDate: filterDate) {
                    TaskRow(task: $0, isPendingTask: false)
                }
            } label: {
                Text("Completed Tasks")
                    .font(.caption)
                    .foregroundStyle(.gray)
            }
        }
        .toolbar {
            ToolbarItem(placement: .bottomBar) {
                Button {

                } label: {
                    HStack {
                        Image(systemName: "plus.circle.fill")
                            .font(.title3)

                        Text("New Task")
                    }
                    .fontWeight(.bold)
                }
                .frame(maxWidth: .infinity, alignment: .leading)

            }
        }
    }
}
이렇게 새롭게 디자인된 TaskRow는 새로 추가된 isPendingTask 파라미터를 함께 전달해야 한다.
해당 파라미터는 진행 중인 Task와 완료된 Task를 구분하게 되므로 서로 반대되게 전달해야 한다.