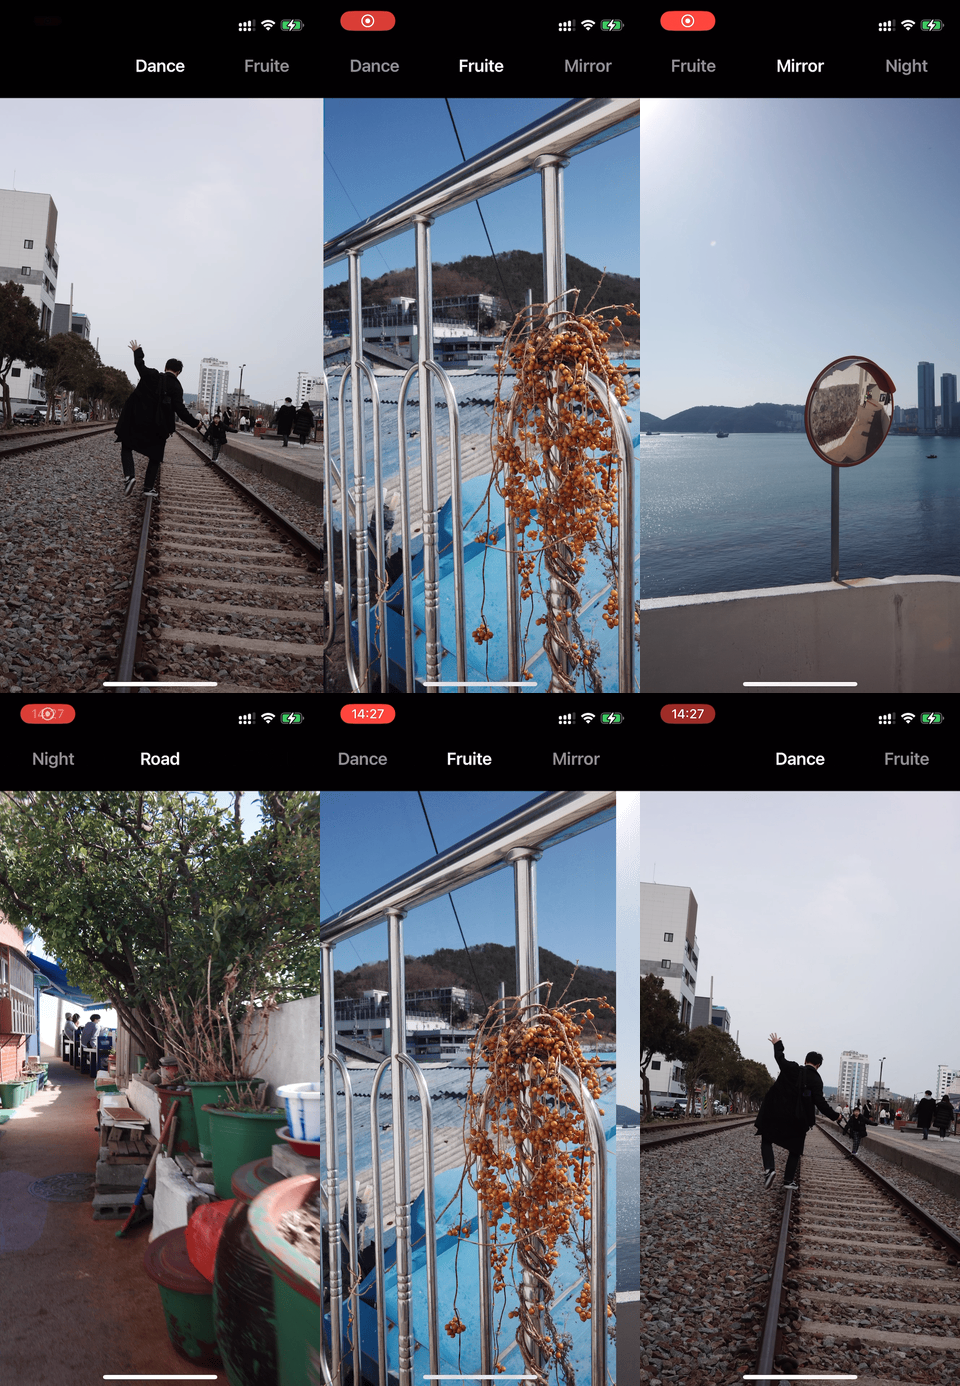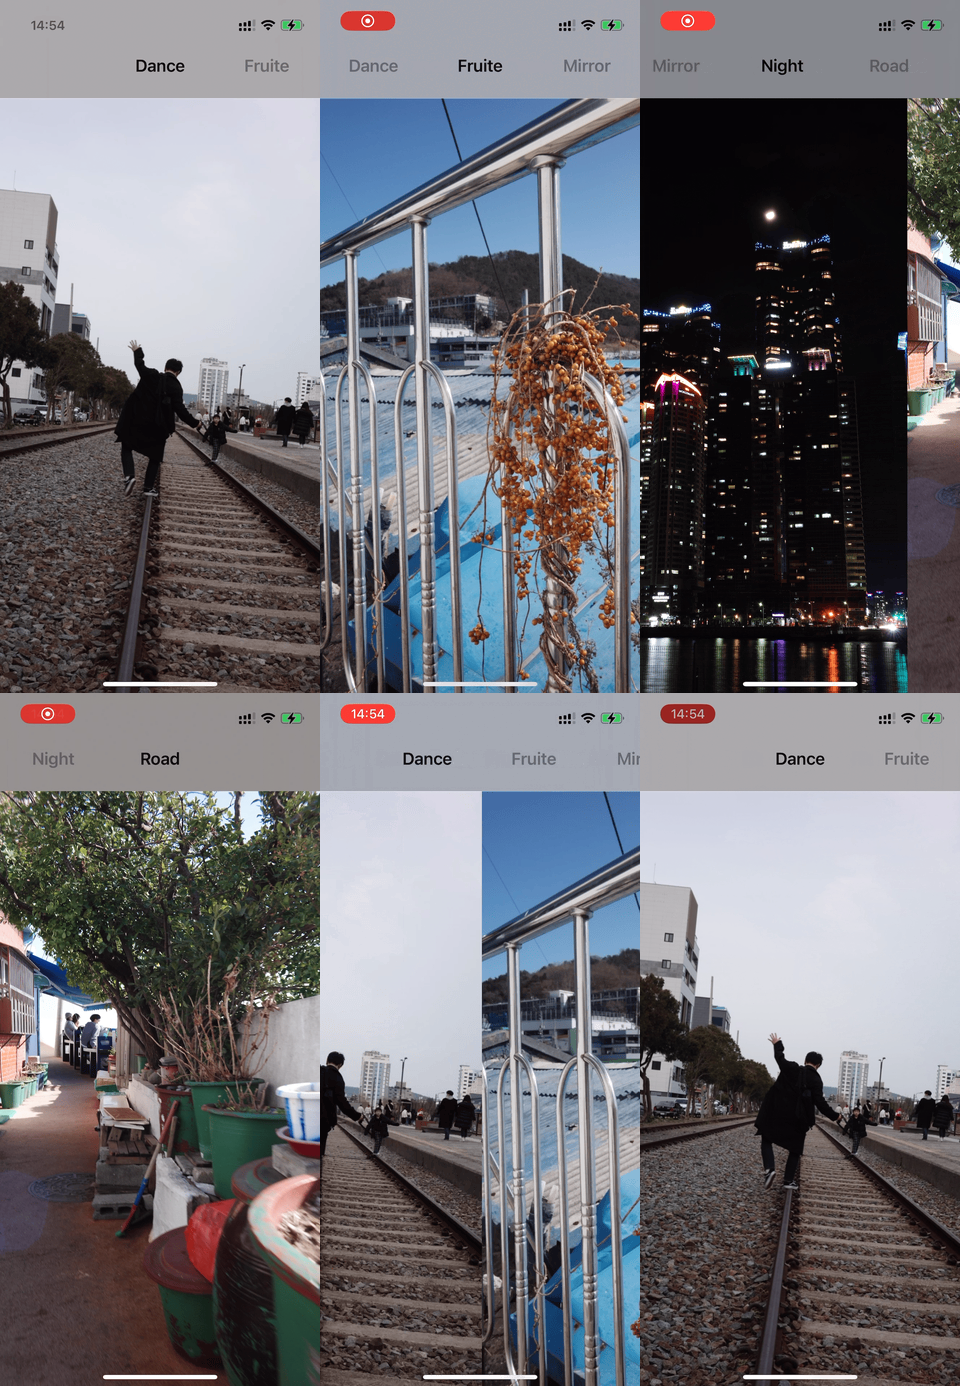

지금 상태로도 매우 좋지만 밝은 사진과 어두운 사진일 때 Indicator가 다소 단조로워 보이는 것이 아쉽다.
이미지의 평균 색상을 추출하기
iOS나 Mac OS의 현행 디자인 코드는 Flat으로 음영과 그림자 등의 그래픽 적인 요소들을 최대한 배제하고, 색과 선, 레이어의 적층으로 깊이와 구분감을 부여하는 것이 특징이다. 개인적으로 이러한
chillog.page
표시되는 이미지의 평균 적인 색상을 추출할 수 있는 방법이 존재하는데,
이미 작성한 포스팅을 기반으로 적용해 조금 더 자연스럽게 만들어 보자.
AverageColorModifier.swift
//
//  AverageColorModifier.swift
//  AutoScrolling
//
//  Created by Martin.Q on 2023/03/15.
//

import SwiftUI

extension UIImage {
    /// There are two main ways to get the color from an image, just a simple "sum up an average" or by squaring their sums. Each has their advantages, but the 'simple' option *seems* better for average color of entire image and closely mirrors CoreImage. Details: https://sighack.com/post/averaging-rgb-colors-the-right-way
    enum AverageColorAlgorithm {
        case simple
        case squareRoot
    }

    func findAverageColor(algorithm: AverageColorAlgorithm = .simple) -> UIColor? {
        guard let cgImage = cgImage else { return nil }

        let size = CGSize(width: 40, height: 40)
        let width = Int(size.width)
        let height = Int(size.height)
        let totalPixels = width * height
        let colorSpace = CGColorSpaceCreateDeviceRGB()
        let bitmapInfo: UInt32 = CGBitmapInfo.byteOrder32Little.rawValue | CGImageAlphaInfo.premultipliedFirst.rawValue

        guard let context = CGContext(data: nil, width: width, height: height, bitsPerComponent: 8, bytesPerRow: width * 4, space: colorSpace, bitmapInfo: bitmapInfo) else { return nil }

        context.draw(cgImage, in: CGRect(origin: .zero, size: size))

        guard let pixelBuffer = context.data else { return nil }

        let pointer = pixelBuffer.bindMemory(to: UInt32.self, capacity: width * height)
        var totalRed = 0
        var totalBlue = 0
        var totalGreen = 0

        for x in 0 ..< width {
            for y in 0 ..< height {
                let pixel = pointer[(y * width) + x]
                let r = red(for: pixel)
                let g = green(for: pixel)
                let b = blue(for: pixel)

                switch algorithm {
                case .simple:
                    totalRed += Int(r)
                    totalBlue += Int(b)
                    totalGreen += Int(g)
                case .squareRoot:
                    totalRed += Int(pow(CGFloat(r), CGFloat(2)))
                    totalGreen += Int(pow(CGFloat(g), CGFloat(2)))
                    totalBlue += Int(pow(CGFloat(b), CGFloat(2)))
                }
            }
        }

        let averageRed: CGFloat
        let averageGreen: CGFloat
        let averageBlue: CGFloat

        switch algorithm {
        case .simple:
            averageRed = CGFloat(totalRed) / CGFloat(totalPixels)
            averageGreen = CGFloat(totalGreen) / CGFloat(totalPixels)
            averageBlue = CGFloat(totalBlue) / CGFloat(totalPixels)
        case .squareRoot:
            averageRed = sqrt(CGFloat(totalRed) / CGFloat(totalPixels))
            averageGreen = sqrt(CGFloat(totalGreen) / CGFloat(totalPixels))
            averageBlue = sqrt(CGFloat(totalBlue) / CGFloat(totalPixels))
        }

        return UIColor(red: averageRed / 255.0, green: averageGreen / 255.0, blue: averageBlue / 255.0, alpha: 1.0)
    }

    private func red(for pixelData: UInt32) -> UInt8 {
        return UInt8((pixelData >> 16) & 255)
    }

    private func green(for pixelData: UInt32) -> UInt8 {
        return UInt8((pixelData >> 8) & 255)
    }

    private func blue(for pixelData: UInt32) -> UInt8 {
        return UInt8((pixelData >> 0) & 255)
    }
}
알고리즘을 프로젝트에 추가한다.
Home.swift
struct Home: View {
    /// View Properties
    @State private var activeTab: Tab = .dance
    @State private var scrollProgress: CGFloat = .zero
    @State private var tapState: AnimationState = .init()
    @State private var avgColor: UIColor = .clear

    var body: some View {
        GeometryReader {
            let size = $0.size
    .
    .
    .
이미지에서 추출한 색을 저장하기 위한 변수를 만들고
Home.swift > extension
extension Home {
    /// Image View
    func TabImageView(_ tab: Tab) -> some View {
        GeometryReader {
            let size = $0.size

            Image(tab.rawValue)
                .resizable()
                .aspectRatio(contentMode: .fill)
                .frame(width: size.width, height: size.height)
                .clipped()
        }
        .ignoresSafeArea(.container, edges: .bottom)
    }

    /// Tab Indicator
    func TabIndicatorView() -> some View {
        GeometryReader {
            let size = $0.size
            let tabWidth = size.width / 3

            HStack(spacing: 0) {
                ForEach(Tab.allCases, id: \.rawValue) { tab in
                    Text(tab.rawValue)
                        .font(.title3.bold())
                        .foregroundColor(activeTab == tab ? .primary : .secondary)
                        .frame(width: tabWidth)
                        .contentShape(Rectangle())
                        .onTapGesture {
                            withAnimation(.easeInOut(duration: 0.3)) {
                                activeTab = tab
                                /// Scroll Progess Explicitly
                                scrollProgress = -CGFloat(tab.index)
                                tapState.startAnimation()
                            }
                        }
                }
            }
            .frame(width: CGFloat(Tab.allCases.count) * tabWidth)
            .padding(.leading, tabWidth)
            .offset(x: scrollProgress * tabWidth)
        }
        .modifier(
            AnimationEndCallBack(endValue: tapState.progress, onEnd: {
                tapState.reset()
            })
        )
        .frame(height: 50)
        .padding(.top, 15)
    }

    private func setAverageColor(tab: Tab) {
        avgColor = UIImage(named: tab.rawValue)?.findAverageColor(algorithm: .simple) ?? .clear
    }
}
호출을 쉽게 하기 위해 메서드를 하나 정의한다.
TabIndicator의 배경이 유동적이기 때문에 가독성을 고려해 Text의 색을 gray에서 secondary로 변경했다.
Home.swift > TabIndicator
.
.
.
                                if !tapState.status {
                                    scrollProgress = max(min(pageProgress, 0), -CGFloat(Tab.allCases.count - 1))
                                }
                            }
                    }
                }
                .tabViewStyle(.page(indexDisplayMode: .never))
            }
            .background{
                Color(avgColor)
                    .overlay(Material.ultraThinMaterial)
                    .ignoresSafeArea()
            }
            .ignoresSafeArea(.container, edges: .bottom)
        }
        .onChange(of: activeTab) { newValue in
            withAnimation {
                self.setAverageColor(tab: activeTab)
            }
        }
        .onAppear {
            withAnimation {
                self.setAverageColor(tab: activeTab)
            }
        }
    }
}
.
.
.
TabIndicator와 TabView는 서로 VStack으로 묶여있다.
따라서 TabIndicator의 배경은 VStack의 배경으로 대체 될 수 있고, 그게 TabVIew의 마지막에서도 자연스러우므로
VStack의 배경을해당 색깔로 변경한다. iOS 디자인 코드에 맞도록 Material을 추가했다.
색 추출 메서드는 VStack이 표시 될 때, activeTab이 변경 될 때 animation과 함께 호출한다.


앱의 배경이 현재 표시하고 있는 Image에 맞춰 유사한 색으로 변경된다.
TabView와 TabIndicator의 Animation을 연동해 뒀기 때문에 관련 자원을 소모하는 상태에서,
Iamge의 크기에 따라 색상을 추출하는 알고리즘에 부하가 심하게 걸리기 때문에 Pixel 접근 방식을 사용했고,
Image의 크기도 Asset을 4K에서 FHD 수준으로 낮춰 진행했다.
'학습 노트 > UIBreaking (2023)' 카테고리의 다른 글
| ParallaxEffect (0) | 2023.06.30 |
|---|---|
| AutoScrolling #05 (0) | 2023.04.04 |
| AutoScrolling #04 (0) | 2023.03.23 |
| AutoScrolling #03 (0) | 2023.03.23 |
| AutoScrolling #02 (0) | 2023.03.22 |


