Constraints with Code #3
Custom Header View
화면 상단에 View를 배치하고,
너비는 margin에 관계없이 모두 채울 수 있도록 제약을 추가한다.
높이는 100pt로 고정한다.
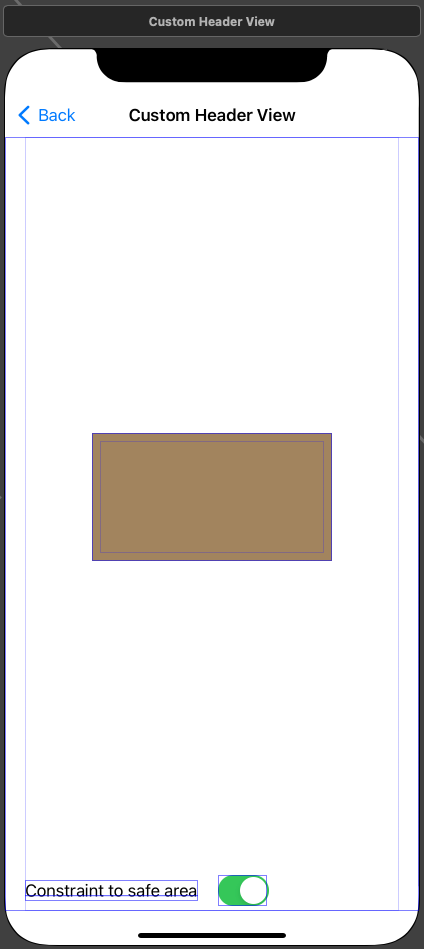
Scene은 위와 같다.

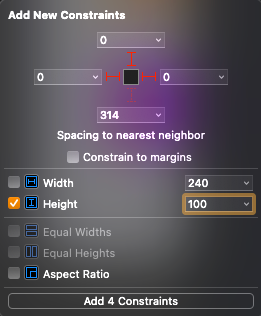
추가되는 제약은 위와 같다.
이때 추가하는 대상은 Safe Area가 아닌 View로 설정해야 하고, Constrain to margins 속성은 비활성화해야 한다.
이렇게 추가하면 System UI의 영역까지 덮게 된다. 만약 System UI를 침범하지 않게 하려면 Safe Area를 기준으로 추가하면 된다.

변경하면 위와 같은 모습이 된다.
//
//  CustomHeaderViewController.swift
//  Constraints with Code Practice
//
//  Created by Martin.Q on 2021/12/18.
//

import UIKit

class CustomHeaderViewController: UIViewController {
	@IBOutlet weak var brownView: UIView!

	@IBAction func updateConstraint(_ sender: UISwitch) {

	}

    override func viewDidLoad() {
        super.viewDidLoad()


    }

}

extension CustomHeaderViewController {
	func layoutWithInitializer() {

	}
	func layoutWithVisualFormLanguage() {

	}
	func layoutWithAnchor() {

	}
}
Scene과 연결된 코드는 위와 같고, Interface Builder에서 추가한 제약을 세 가지 방법으로 추가한다.
NSLayoutConstraint로 제약 추가하기
func layoutWithInitializer() {
	brownView.translatesAutoresizingMaskIntoConstraints = false

	let height = NSLayoutConstraint(item: brownView, attribute: .height, relatedBy: .equal, toItem: nil, attribute: .notAnAttribute, multiplier: 1.0, constant: 100)
	let top = NSLayoutConstraint(item: brownView, attribute: .top, relatedBy: .equal, toItem: view, attribute: .top, multiplier: 1.0, constant: 0)
	let leading = NSLayoutConstraint(item: brownView, attribute: .leading, relatedBy: .equal, toItem: view, attribute: .leading, multiplier: 1.0, constant: 0)
	let trailing = NSLayoutConstraint(item: brownView, attribute: .trailing, relatedBy: .equal, toItem: view, attribute: .trailing, multiplier: 1.0, constant: 0)

	NSLayoutConstraint.activate([height, top, leading, trailing])
}
제약을 추가하는 방식은 이전과 같다.

코드에서 Safe Area가 아닌 Superview를 기준으로 제약을 추가했기 때문에 System UI를 침범한 상태로 표시된다.
제약은 Interface Builder에서 생성했던 것과 마찬가지로 한번 생성하면 수정할 수 없다.
따라서 아래에 표시되는 Switch로 제약을 변경해 표시하기 위해서는 제약을 두 개 만들어야 한다.
class CustomHeaderViewController: UIViewController {
	@IBOutlet weak var brownView: UIView!

	var topToSuperview: NSLayoutConstraint?
	var topToSafeArea: NSLayoutConstraint?

	@IBAction func updateConstraint(_ sender: UISwitch) {

	}

    override func viewDidLoad() {
        super.viewDidLoad()

		layoutWithInitializer()
    }

}
클래스에서 제약을 저장할 변수를 미리 생성하고, 메서드 내에서 해당 변수에 저장하는 방식으로 사용하면 된다.
//
//  CustomHeaderViewController.swift
//  Constraints with Code Practice
//
//  Created by Martin.Q on 2021/12/18.
//

import UIKit

class CustomHeaderViewController: UIViewController {
	@IBOutlet weak var brownView: UIView!

	var topToSuperview: NSLayoutConstraint?
	var topToSafeArea: NSLayoutConstraint?

	@IBAction func updateConstraint(_ sender: UISwitch) {
		topToSuperview?.isActive = !sender.isOn
		topToSafeArea?.isActive = sender.isOn
	}

    override func viewDidLoad() {
        super.viewDidLoad()

		layoutWithInitializer()
    }

}

extension CustomHeaderViewController {
	func layoutWithInitializer() {
		brownView.translatesAutoresizingMaskIntoConstraints = false

		let height = NSLayoutConstraint(item: brownView, attribute: .height, relatedBy: .equal, toItem: nil, attribute: .notAnAttribute, multiplier: 1.0, constant: 100)
		let top = NSLayoutConstraint(item: brownView, attribute: .top, relatedBy: .equal, toItem: view, attribute: .top, multiplier: 1.0, constant: 0)
		let leading = NSLayoutConstraint(item: brownView, attribute: .leading, relatedBy: .equal, toItem: view, attribute: .leading, multiplier: 1.0, constant: 0)
		let trailing = NSLayoutConstraint(item: brownView, attribute: .trailing, relatedBy: .equal, toItem: view, attribute: .trailing, multiplier: 1.0, constant: 0)

		NSLayoutConstraint.activate([height, top, leading, trailing])

		topToSuperview = top
		topToSafeArea = NSLayoutConstraint(item: brownView, attribute: .top, relatedBy: .equal, toItem: view.safeAreaLayoutGuide, attribute: .top, multiplier: 1.0, constant: 0)
	}
	func layoutWithVisualFormLanguage() {

	}
	func layoutWithAnchor() {

	}
}
위와 같은 모습이 된다.
스위치를 토글 할 때마다 상단 제약이 변경되게 되는데,

이번엔 위와 같은 로그가 남게 된다.
내용은 제약의 충돌로 원인은 간단하다.
두 제약이 교차되는 시점에 모두 active 상태이기 때문에 충돌이 발생한다.
따라서 한쪽은 비활성화하는 것으로 문제를 해결할 수 있다.
@IBAction func updateConstraint(_ sender: UISwitch) {
	if sender.isOn {
		topToSuperview?.isActive = false
		topToSafeArea?.isActive = true
	} else {
		topToSafeArea?.isActive = false
		topToSuperview?.isActive = true
	}
}
수정한 메서드는 위와 같다.

잘 작동하는 것을 볼 수 있다.
즉, 제약을 교체하는 경우 먼저 활성화됐던 제약을 비활성화하고, 새로운 제약을 활성화해야 한다.
그러지 않으면 제약 오류가 발생한다.
Visaul Format Language로 제약 추가하기
Visaul Format Language 방식의 단점 중 하나는 '모든 제약을 표현할 수 없다.'라는 것이다.
이번에 사용하는 Safe Area에 관한 제약이 바로 그것으로, 이 경우 복잡하게 Visual Format Language를 사용하지 않고,
NSLayoutConstraint 방식이나 NSLayoutAnchor 방식을 사용해 구현해도 무관하다.
unc layoutWithVisualFormLanguage() {
	brownView.translatesAutoresizingMaskIntoConstraints = false

	let horizontal = "|[b]|"
	let vertical = "V:|[b(100)]"

	let views: [String: Any] = ["b": brownView]

	let horizontalConstraint = NSLayoutConstraint.constraints(withVisualFormat: horizontal, options: [], metrics: nil, views: views)
	let verticalConstraint = NSLayoutConstraint.constraints(withVisualFormat: vertical, options: [], metrics: nil, views: views)

	NSLayoutConstraint.activate(horizontalConstraint + verticalConstraint)
}
따라서 Superview에 적용되는 제약만 추가한다.
NSLayoutConstraint에서 사용했던 테크닉을 사용해 다른 방식과 결합해 같은 동작을 구현할 수 있다.
NSLayoutAnchor
func layoutWithAnchor() {
	brownView.translatesAutoresizingMaskIntoConstraints = false

	brownView.leadingAnchor.constraint(equalTo: view.leadingAnchor).isActive = true
	brownView.trailingAnchor.constraint(equalTo: view.trailingAnchor).isActive = true
	brownView.heightAnchor.constraint(equalToConstant: 100).isActive = true

	topToSuperview = brownView.topAnchor.constraint(equalTo: view.topAnchor)
	topToSuperview?.isActive = true

	topToSafeArea = brownView.topAnchor.constraint(equalTo: view.safeAreaLayoutGuide.topAnchor)
}
코드를 추가하는 방식은 동일하고, class에서 미리 생성한 변수에 제약을 먼저 전달한 뒤,
해당 변수를 사용해 활성화하는 방식으로 사용한다.
주의
brownView.topAnchor.constraint(equalTo: view.safeAreaLayoutGuide.topAnchor)Safe Area에 관련된 제약을 추가할 때 safeAreatLayoutGuide.topAnchor를 사용하는데,
해당 속성은 iOS 11 이상에서만 사용할 수 있다.
그 이하의 버전에서는
brownView.topAnchor.constraint(equalTo: topLayoutGuide.bottomAnchor)위와 같이 topLayoutGuide.bottomAnchor를 사용해야 한다.
이는 Safe Area의 구조가 iOS 11을 기준으로 상, 하의 이분적 구조에서 중앙의 단일 구조로 변경된 것에 대한 차이이다.
Grid
이번에는 바둑판 배열을 만들어 본다.
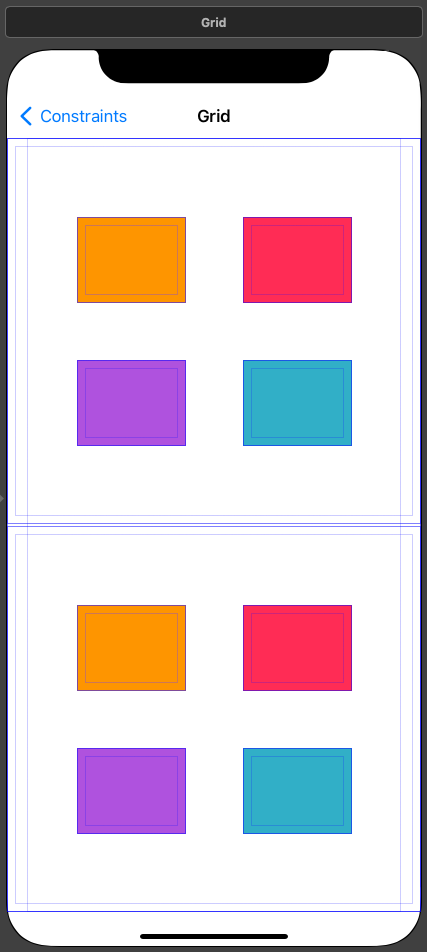
사용할 Scene은 위와 같다.
Equal Height와 Equal Width를 사용해 Superview를 꽉 차게 바둑판식으로 배열한다.


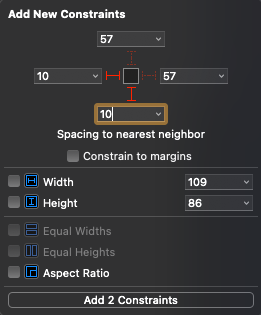

각각의 View들은 위와 같은 제약을 설정한다.
모든 방향에 10pt의 여백을 갖게 된다.
이어서 Equal Width와 Equal Height를 적용해 모든 View가 같은 높이와 너비를 갖도록 제약을 추가한다.
오른쪽 마우스로 드래그해 주황색 View에 연결하고, Equal Height와 Equal Width를 적용한다.

표시되는 UI는 위와 같다.
NSLayoutConstraint로 제약 추가하기
func layoutWithInitializer() {
	orangeView.translatesAutoresizingMaskIntoConstraints = false
	pinkView.translatesAutoresizingMaskIntoConstraints = fasle
	purpleView.translatesAutoresizingMaskIntoConstraints = false
	tealView.translatesAutoresizingMaskIntoConstraints = false

	var top = NSLayoutConstraint(item: orangeView, attribute: .top, relatedBy: .equal, toItem: bottomContainer, attribute: .top, multiplier: 1.0, constant: 10)
	var leading = NSLayoutConstraint(item: orangeView, attribute: .leading, relatedBy: .equal, toItem: bottomContainer, attribute: .leading, multiplier: 1.0, constant: 10)
	var trailing = NSLayoutConstraint(item: orangeView, attribute: .trailing, relatedBy: .equal, toItem: pinkView, attribute: .leading, multiplier: 1.0, constant: -10)
	var bottom = NSLayoutConstraint(item: orangeView, attribute: .bottom, relatedBy: .equal, toItem: purpleView, attribute: .top, multiplier: 1.0, constant: -10)

	NSLayoutConstraint.activate([top, leading, trailing, bottom])

	top = NSLayoutConstraint(item: pinkView, attribute: .top, relatedBy: .equal, toItem: bottomContainer, attribute: .top, multiplier: 1.0, constant: 10)
	trailing = NSLayoutConstraint(item: pinkView, attribute: .trailing, relatedBy: .equal, toItem: bottomContainer, attribute: .trailing, multiplier: 1.0, constant: 10)
	bottom = NSLayoutConstraint(item: pinkView, attribute: .bottom, relatedBy: .equal, toItem: tealView, attribute: .top, multiplier: 1.0, constant: -10)

	NSLayoutConstraint.activate([top, trailing, bottom])

	leading = NSLayoutConstraint(item: purpleView, attribute: .leading, relatedBy: .equal, toItem: bottomContainer, attribute: .leading, multiplier: 1.0, constant: 10)
	trailing = NSLayoutConstraint(item: purpleView, attribute: .trailing, relatedBy: .equal, toItem: tealView, attribute: .leading, multiplier: 1.0, constant: -10)
	bottom = NSLayoutConstraint(item: purpleView, attribute: .bottom, relatedBy: .equal, toItem: bottomContainer, attribute: .bottom, multiplier: 1.0, constant: 10)

	NSLayoutConstraint.activate([leading, trailing, bottom])

	trailing = NSLayoutConstraint(item: tealView, attribute: .trailing, relatedBy: .equal, toItem: bottomContainer, attribute: .trailing, multiplier: 1.0, constant: 10)
	bottom = NSLayoutConstraint(item: tealView, attribute: .bottom, relatedBy: .equal, toItem: bottomContainer, attribute: .bottom, multiplier: 1.0, constant: 10)

	NSLayoutConstraint.activate([trailing, bottom])
}
기본적으로 추가되는 제약은 위와 같다.
제약을 추가할 때 attribute1과 attribute2를 겹쳐놓고, 왼쪽으로 이동하면 -, 위쪽으로 이동하면 -이다.
이는 iOS의 좌표체계에 의한 것으로 iOS 좌표체계는 항상 좌측 상단이 0,0이기 때문에 constant 값을 지정할 때 주의해야 한다.

하지만 여전히 동작하지 않는데, 이유는 높이와 너비에 관한 제약이 아직 적용되지 않았기 때문이다.
func layoutWithInitializer() {
	orangeView.translatesAutoresizingMaskIntoConstraints = false
	pinkView.translatesAutoresizingMaskIntoConstraints = false
	purpleView.translatesAutoresizingMaskIntoConstraints = false
	tealView.translatesAutoresizingMaskIntoConstraints = false

	var top = NSLayoutConstraint(item: orangeView, attribute: .top, relatedBy: .equal, toItem: bottomContainer, attribute: .top, multiplier: 1.0, constant: 10)
	var leading = NSLayoutConstraint(item: orangeView, attribute: .leading, relatedBy: .equal, toItem: bottomContainer, attribute: .leading, multiplier: 1.0, constant: 10)
	var trailing = NSLayoutConstraint(item: orangeView, attribute: .trailing, relatedBy: .equal, toItem: pinkView, attribute: .leading, multiplier: 1.0, constant: -10)
	var bottom = NSLayoutConstraint(item: orangeView, attribute: .bottom, relatedBy: .equal, toItem: purpleView, attribute: .top, multiplier: 1.0, constant: -10)

	NSLayoutConstraint.activate([top, leading, trailing, bottom])

	top = NSLayoutConstraint(item: pinkView, attribute: .top, relatedBy: .equal, toItem: bottomContainer, attribute: .top, multiplier: 1.0, constant: 10)
	trailing = NSLayoutConstraint(item: pinkView, attribute: .trailing, relatedBy: .equal, toItem: bottomContainer, attribute: .trailing, multiplier: 1.0, constant: -10)
	bottom = NSLayoutConstraint(item: pinkView, attribute: .bottom, relatedBy: .equal, toItem: tealView, attribute: .top, multiplier: 1.0, constant: -10)

	NSLayoutConstraint.activate([top, trailing, bottom])

	leading = NSLayoutConstraint(item: purpleView, attribute: .leading, relatedBy: .equal, toItem: bottomContainer, attribute: .leading, multiplier: 1.0, constant: 10)
	trailing = NSLayoutConstraint(item: purpleView, attribute: .trailing, relatedBy: .equal, toItem: tealView, attribute: .leading, multiplier: 1.0, constant: -10)
	bottom = NSLayoutConstraint(item: purpleView, attribute: .bottom, relatedBy: .equal, toItem: bottomContainer, attribute: .bottom, multiplier: 1.0, constant: -10)

	NSLayoutConstraint.activate([leading, trailing, bottom])

	trailing = NSLayoutConstraint(item: tealView, attribute: .trailing, relatedBy: .equal, toItem: bottomContainer, attribute: .trailing, multiplier: 1.0, constant: -10)
	bottom = NSLayoutConstraint(item: tealView, attribute: .bottom, relatedBy: .equal, toItem: bottomContainer, attribute: .bottom, multiplier: 1.0, constant: -10)

	NSLayoutConstraint.activate([trailing, bottom])

	let list: [UIView] = [pinkView, purpleView, tealView]
	for v in list {
		let equalWidth = NSLayoutConstraint(item: v, attribute: .width, relatedBy: .equal, toItem: orangeView, attribute: .width, multiplier: 1.0, constant: 0)
		let equalHeight = NSLayoutConstraint(item: v, attribute: .height, relatedBy: .equal, toItem: orangeView, attribute: .height, multiplier: 1.0, constant: 0)
		NSLayoutConstraint.activate([equalWidth, equalHeight])
	}
}
완성된 코드는 위와 같다.
Equal Height와 Equal Width는 동일한 제약에 대상만 바뀌므로 위와 같이 반복문을 사용하여 간단하게 적용할 수 있다.
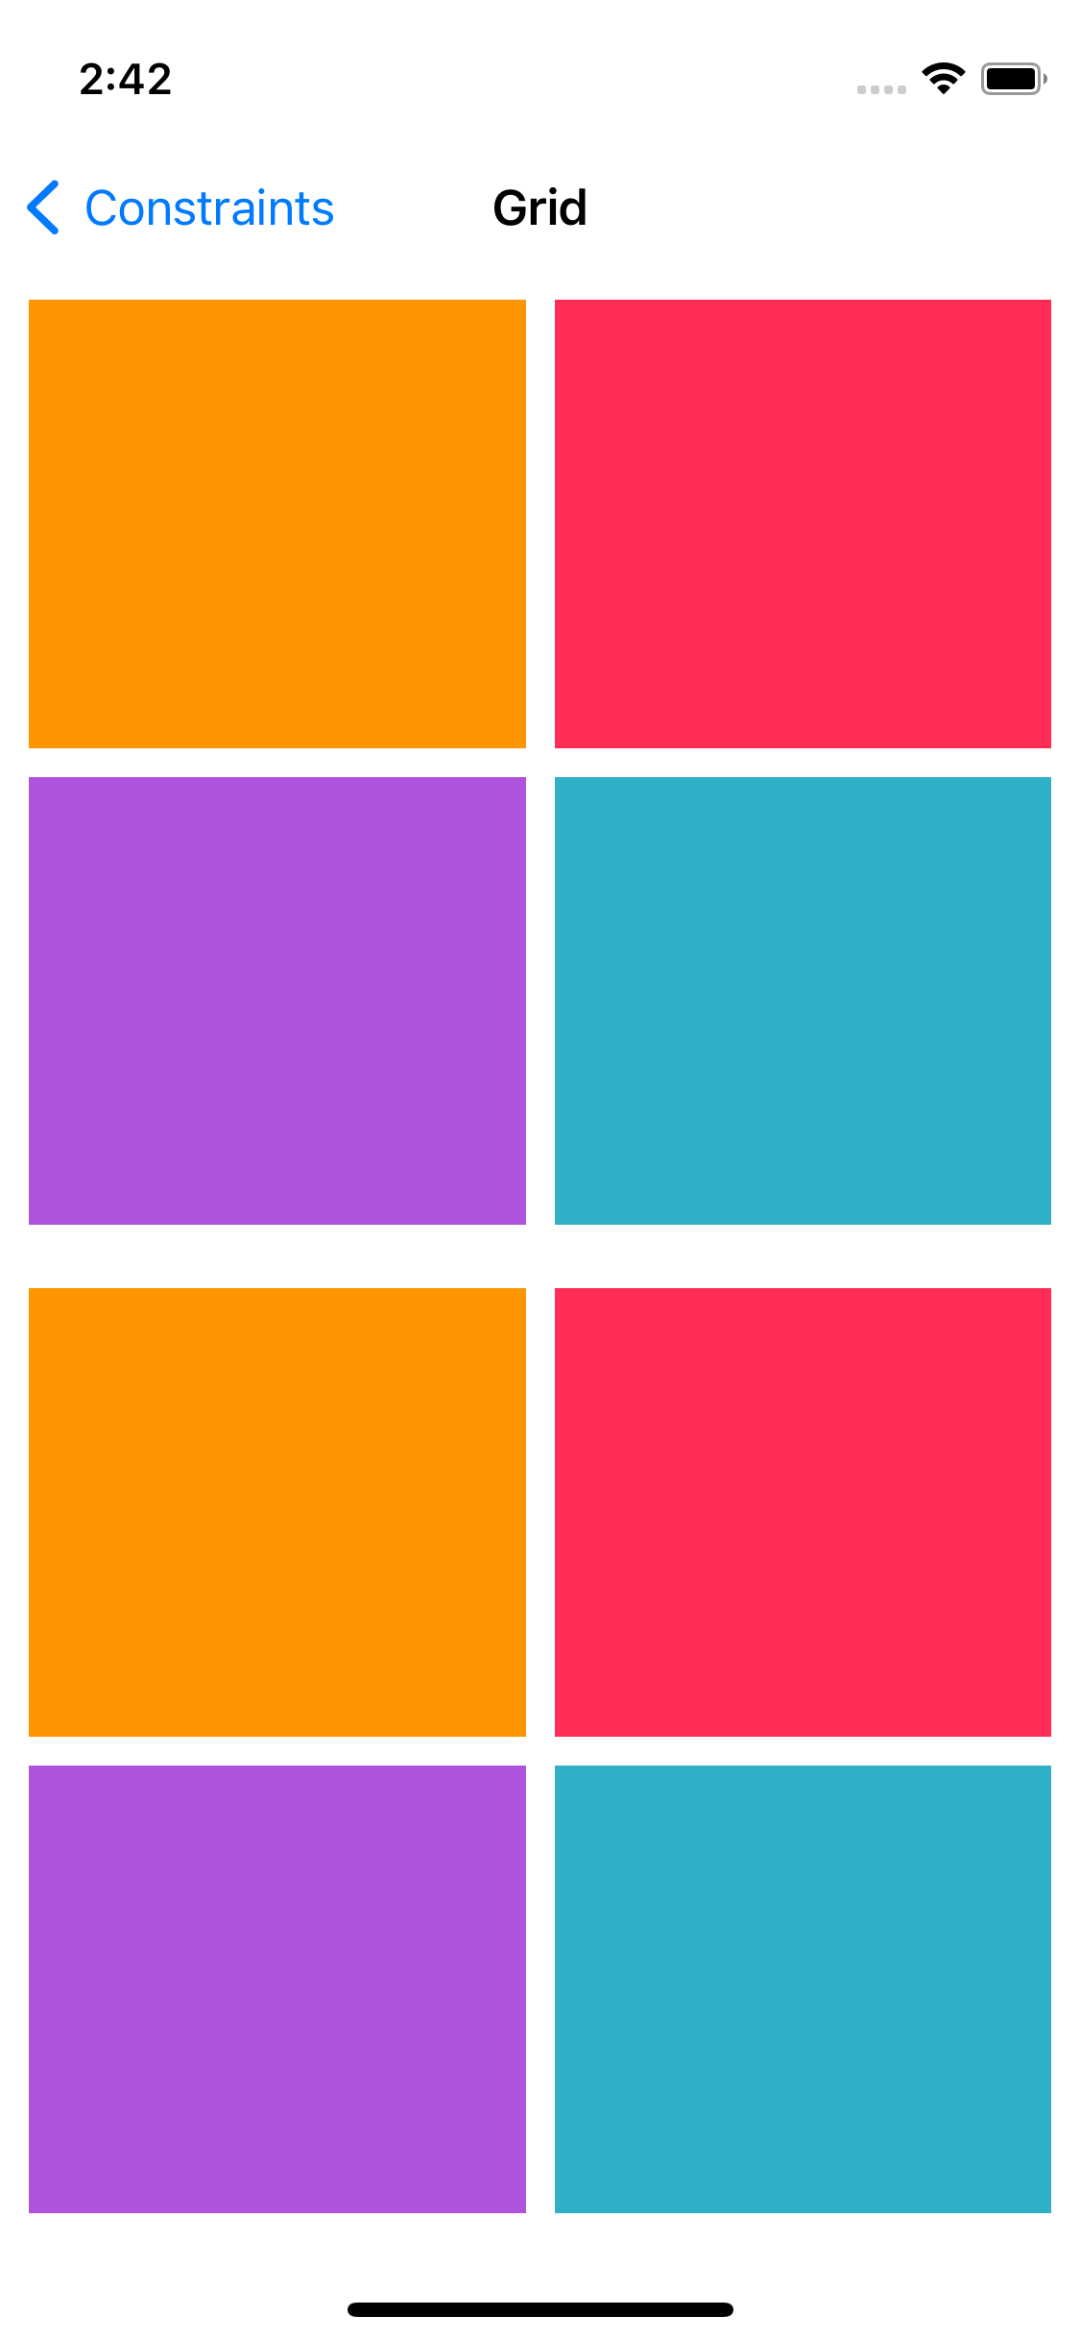
적용된 화면도 완전히 동일하다.
Visual Format Language으로 제약 추가하기
func layoutWithVisualFormLanguage() {
	orangeView.translatesAutoresizingMaskIntoConstraints = false
	pinkView.translatesAutoresizingMaskIntoConstraints = false
	purpleView.translatesAutoresizingMaskIntoConstraints = false
	tealView.translatesAutoresizingMaskIntoConstraints = false

	let horizontal1 = "|-10-[o]-10-[pi(==o)]-10-|"
	let horizontal2 = "|-10-[p]-10-[t(==o)]-10-|"
	let vertical1 = "V:|-10-[o]-10-[p(==o)]-10-|"
	let vertical2 = "V:|-10-[pi]-10-[t(==o)]-10-|"

	let views: [String: Any] = ["o": orangeView, "pi": pinkView, "p": purpleView, "t": tealView]

	let horizontalConstraint1 = NSLayoutConstraint.constraints(withVisualFormat: horizontal1, options: [], metrics: nil, views: views)
	let horizontalConstraint2 = NSLayoutConstraint.constraints(withVisualFormat: horizontal2, options: [], metrics: nil, views: views)
	let verticalConstraint1 = NSLayoutConstraint.constraints(withVisualFormat: vertical1, options: [], metrics: nil, views: views)
	let verticalConstraint2 = NSLayoutConstraint.constraints(withVisualFormat: vertical2, options: [], metrics: nil, views: views)

	NSLayoutConstraint.activate(horizontalConstraint1 + horizontalConstraint2 + verticalConstraint1 + verticalConstraint2)
}
코드는 위와 같다.
10으로 표현된 Margin은 다음과 같이 metrics Dictionary를 만들어 전달해 문자열로 대체할 수 있다.
func layoutWithVisualFormLanguage() {
	orangeView.translatesAutoresizingMaskIntoConstraints = false
	pinkView.translatesAutoresizingMaskIntoConstraints = false
	purpleView.translatesAutoresizingMaskIntoConstraints = false
	tealView.translatesAutoresizingMaskIntoConstraints = false

	let horizontal1 = "|-m-[o]-m-[pi(==o)]-m-|"
	let horizontal2 = "|-m-[p]-m-[t(==o)]-m-|"
	let vertical1 = "V:|-m-[o]-m-[p(==o)]-m-|"
	let vertical2 = "V:|-m-[pi]-m-[t(==o)]-m-|"

	let views: [String: Any] = ["o": orangeView, "pi": pinkView, "p": purpleView, "t": tealView]

	let margin: CGFloat = 10

	let metrics: [String: Any] = ["m": margin]

	let horizontalConstraint1 = NSLayoutConstraint.constraints(withVisualFormat: horizontal1, options: [], metrics: metrics, views: views)
	let horizontalConstraint2 = NSLayoutConstraint.constraints(withVisualFormat: horizontal2, options: [], metrics: metrics, views: views)
	let verticalConstraint1 = NSLayoutConstraint.constraints(withVisualFormat: vertical1, options: [], metrics: metrics, views: views)
	let verticalConstraint2 = NSLayoutConstraint.constraints(withVisualFormat: vertical2, options: [], metrics: metrics, views: views)

	NSLayoutConstraint.activate(horizontalConstraint1 + horizontalConstraint2 + verticalConstraint1 + verticalConstraint2)
}
결과는 위와 동일하다.
NSLayoutAnchor로 제약 추가하기
func layoutWithAnchor() {
	orangeView.translatesAutoresizingMaskIntoConstraints = false
	pinkView.translatesAutoresizingMaskIntoConstraints = false
	purpleView.translatesAutoresizingMaskIntoConstraints = false
	tealView.translatesAutoresizingMaskIntoConstraints = false

	orangeView.topAnchor.constraint(equalTo: bottomContainer.topAnchor, constant: 10).isActive = true
	orangeView.leadingAnchor.constraint(equalTo: bottomContainer.leadingAnchor, constant: 10).isActive = true
	orangeView.trailingAnchor.constraint(equalTo: pinkView.leadingAnchor, constant: -10).isActive = true
	orangeView.bottomAnchor.constraint(equalTo: purpleView.topAnchor, constant: -10).isActive = true

	pinkView.topAnchor.constraint(equalTo: bottomContainer.topAnchor, constant: 10).isActive = true
	pinkView.trailingAnchor.constraint(equalTo: bottomContainer.trailingAnchor, constant: -10).isActive = true
	pinkView.bottomAnchor.constraint(equalTo: tealView.topAnchor, constant: -10).isActive = true
	pinkView.heightAnchor.constraint(equalTo: orangeView.heightAnchor).isActive = true
	pinkView.widthAnchor.constraint(equalTo: orangeView.widthAnchor).isActive = true

	purpleView.leadingAnchor.constraint(equalTo: bottomContainer.leadingAnchor, constant: 10).isActive = true
	purpleView.trailingAnchor.constraint(equalTo: tealView.leadingAnchor, constant: -10).isActive = true
	purpleView.bottomAnchor.constraint(equalTo: bottomContainer.bottomAnchor, constant: 10).isActive = true
	purpleView.heightAnchor.constraint(equalTo: orangeView.heightAnchor).isActive = true
	purpleView.widthAnchor.constraint(equalTo: orangeView.widthAnchor).isActive = true

	tealView.trailingAnchor.constraint(equalTo: bottomContainer.trailingAnchor, constant: -10).isActive = true
	tealView.bottomAnchor.constraint(equalTo: bottomContainer.bottomAnchor, constant: -10).isActive = true
	tealView.heightAnchor.constraint(equalTo: orangeView.heightAnchor).isActive = true
	tealView.widthAnchor.constraint(equalTo: orangeView.widthAnchor).isActive = true
}
코드는 위와 같고, 결과도 동일하다.
'학습 노트 > iOS (2021)' 카테고리의 다른 글
| 167. Constraints with Code #5 (0) | 2021.12.21 |
|---|---|
| 166. Constraints with Code #4 (0) | 2021.12.20 |
| 164. Constraints with code #2 (0) | 2021.12.17 |
| 163. Constraints with Code #1 (0) | 2021.12.16 |
| 162. Auto Layout Practice #2 (0) | 2021.12.16 |


